![]()
![]()
feature
Self-Donning Sterile Gloves
Learning Engineering Design Through an Everyday Problem in Healthcare

Healthcare-associated infections (HAIs) are one of the most critical threats to patient safety, affecting one out of every 31 hospital patients at any one time. Over a million HAIs occur in the United States annually, which results in about 90,000 deaths and an estimated $25 billion in healthcare costs (Centers for Disease Control [CDC] 2019). Both sophisticated and straightforward infection prevention measures can be used to prevent HAIs. One of these measures is ensuring a sterile field during surgery and other invasive procedures. Although healthcare professionals sometimes work in teams to don sterile outerwear, nurses are often tasked with self-donning in critical situations.
Our design task explores potential solutions to the problem of self-donning sterile gloves. Students use design thinking to identify criteria and constraints, develop potential designs, and then use sterile gloves in packaging from the manufacturer and other simple materials to construct an early stage prototype. This activity could be used in a STEM elective or enrichment course, such as an introductory course on personal health or health sciences. This lesson could be taught as part of a unit that includes developing understanding of cell theory, specifically the idea that new cell can only arise from existing cells, which is how pathogenic bacteria can spread from healthcare workers to patients.
Our healthcare-inspired engineering design lesson draws on Capobianco, Nyquist, and Tyrie’s (2013) seven essential design features: (1) it is client driven and goal oriented; (2) provides an authentic context; (3) incorporates constraints; (4) uses materials, resources, and tools that are familiar to students; (5) requires the solution to be an artifact or process; (6) yields more than one solution; and (7) involves teamwork (see Table 1).
| Table 1. Description of the essential features of teaching science through engineering design (Capobianco, Nyquist, and Tyrie 2013). | ||||||||||||||||
|---|---|---|---|---|---|---|---|---|---|---|---|---|---|---|---|---|
|
Part I. Defining and delimiting the engineering problem (75 minutes)
Elicit students’ background knowledge as a warm-up at the beginning of class by asking the following questions: Why do doctors and nurses wear gloves, masks, and gowns during medical procedures? What might happen to patients if doctors and nurses didn’t wear this equipment? The point here is to get students thinking about the spread of disease through bacteria and other pathogens and how medical staff use personal protective equipment (PPE) to prevent the spread of pathogens. Then have students read two infographics published by the CDC (“Protect patients from antibiotic-resistant infections” and “Protect every patient every time”; see Resources). Prompt students to find information on these two infographics that addresses the two questions. This process is intended to promote student knowledge about the extent of the problem.
Next, provide context for the engineering design problem they’ll be solving by showing a video (“Procedural video for self-gowning”; see Resources) in which a nurse models the entire process of self-gowning. Note that self-donning of sterile gloves begins at about minute 3:30; this portion of the video is most salient to the problem students will attempt to solve. A second video is available with no narration showing a medical professional self-donning sterile gloves (see Resources). Have students take notes about what they observe in the video(s). What is the nurse attempting to do in the video? Why is she doing it this way? What are potential issues with the process she is using? After watching the video, facilitate a whole-class discussion using a T-chart to list the challenges faced by the nurse in self-donning sterile gloves and the possible issues with her process. For potential talking points, see Table 2. Overall, this process followed by the nurse in this video should elucidate the fact that the current packaging was not designed to help healthcare professionals self-don the sterile gloves.
| Table 2. T-chart with potential talking points about the problematic process of self-donning sterile gloves by a nurse. | ||||
|---|---|---|---|---|
|
Once students have a clear understanding of the design problem, present them with this problem statement: “Your goal is to re-engineer packaging for sterile gloves to make it easier for health professionals to self-don.” At this point, students should be divided into small teams of two or three. Provide each team with one pair of sterile gloves still in their packaging, such as the one shown in Figure 1, and the box in which the gloves are stored (see Table 3 for a list of materials with sources). If sterile gloves are not available, teachers can present students with regular gloves “packaged” in a sheet of construction paper or white copy paper. If gloves are not available due to COVID-19, teachers could also fashion makeshift gloves from two pieces of plastic wrap or plastic sheeting cut using a hand-shaped template and affixed using staples or adhesive.
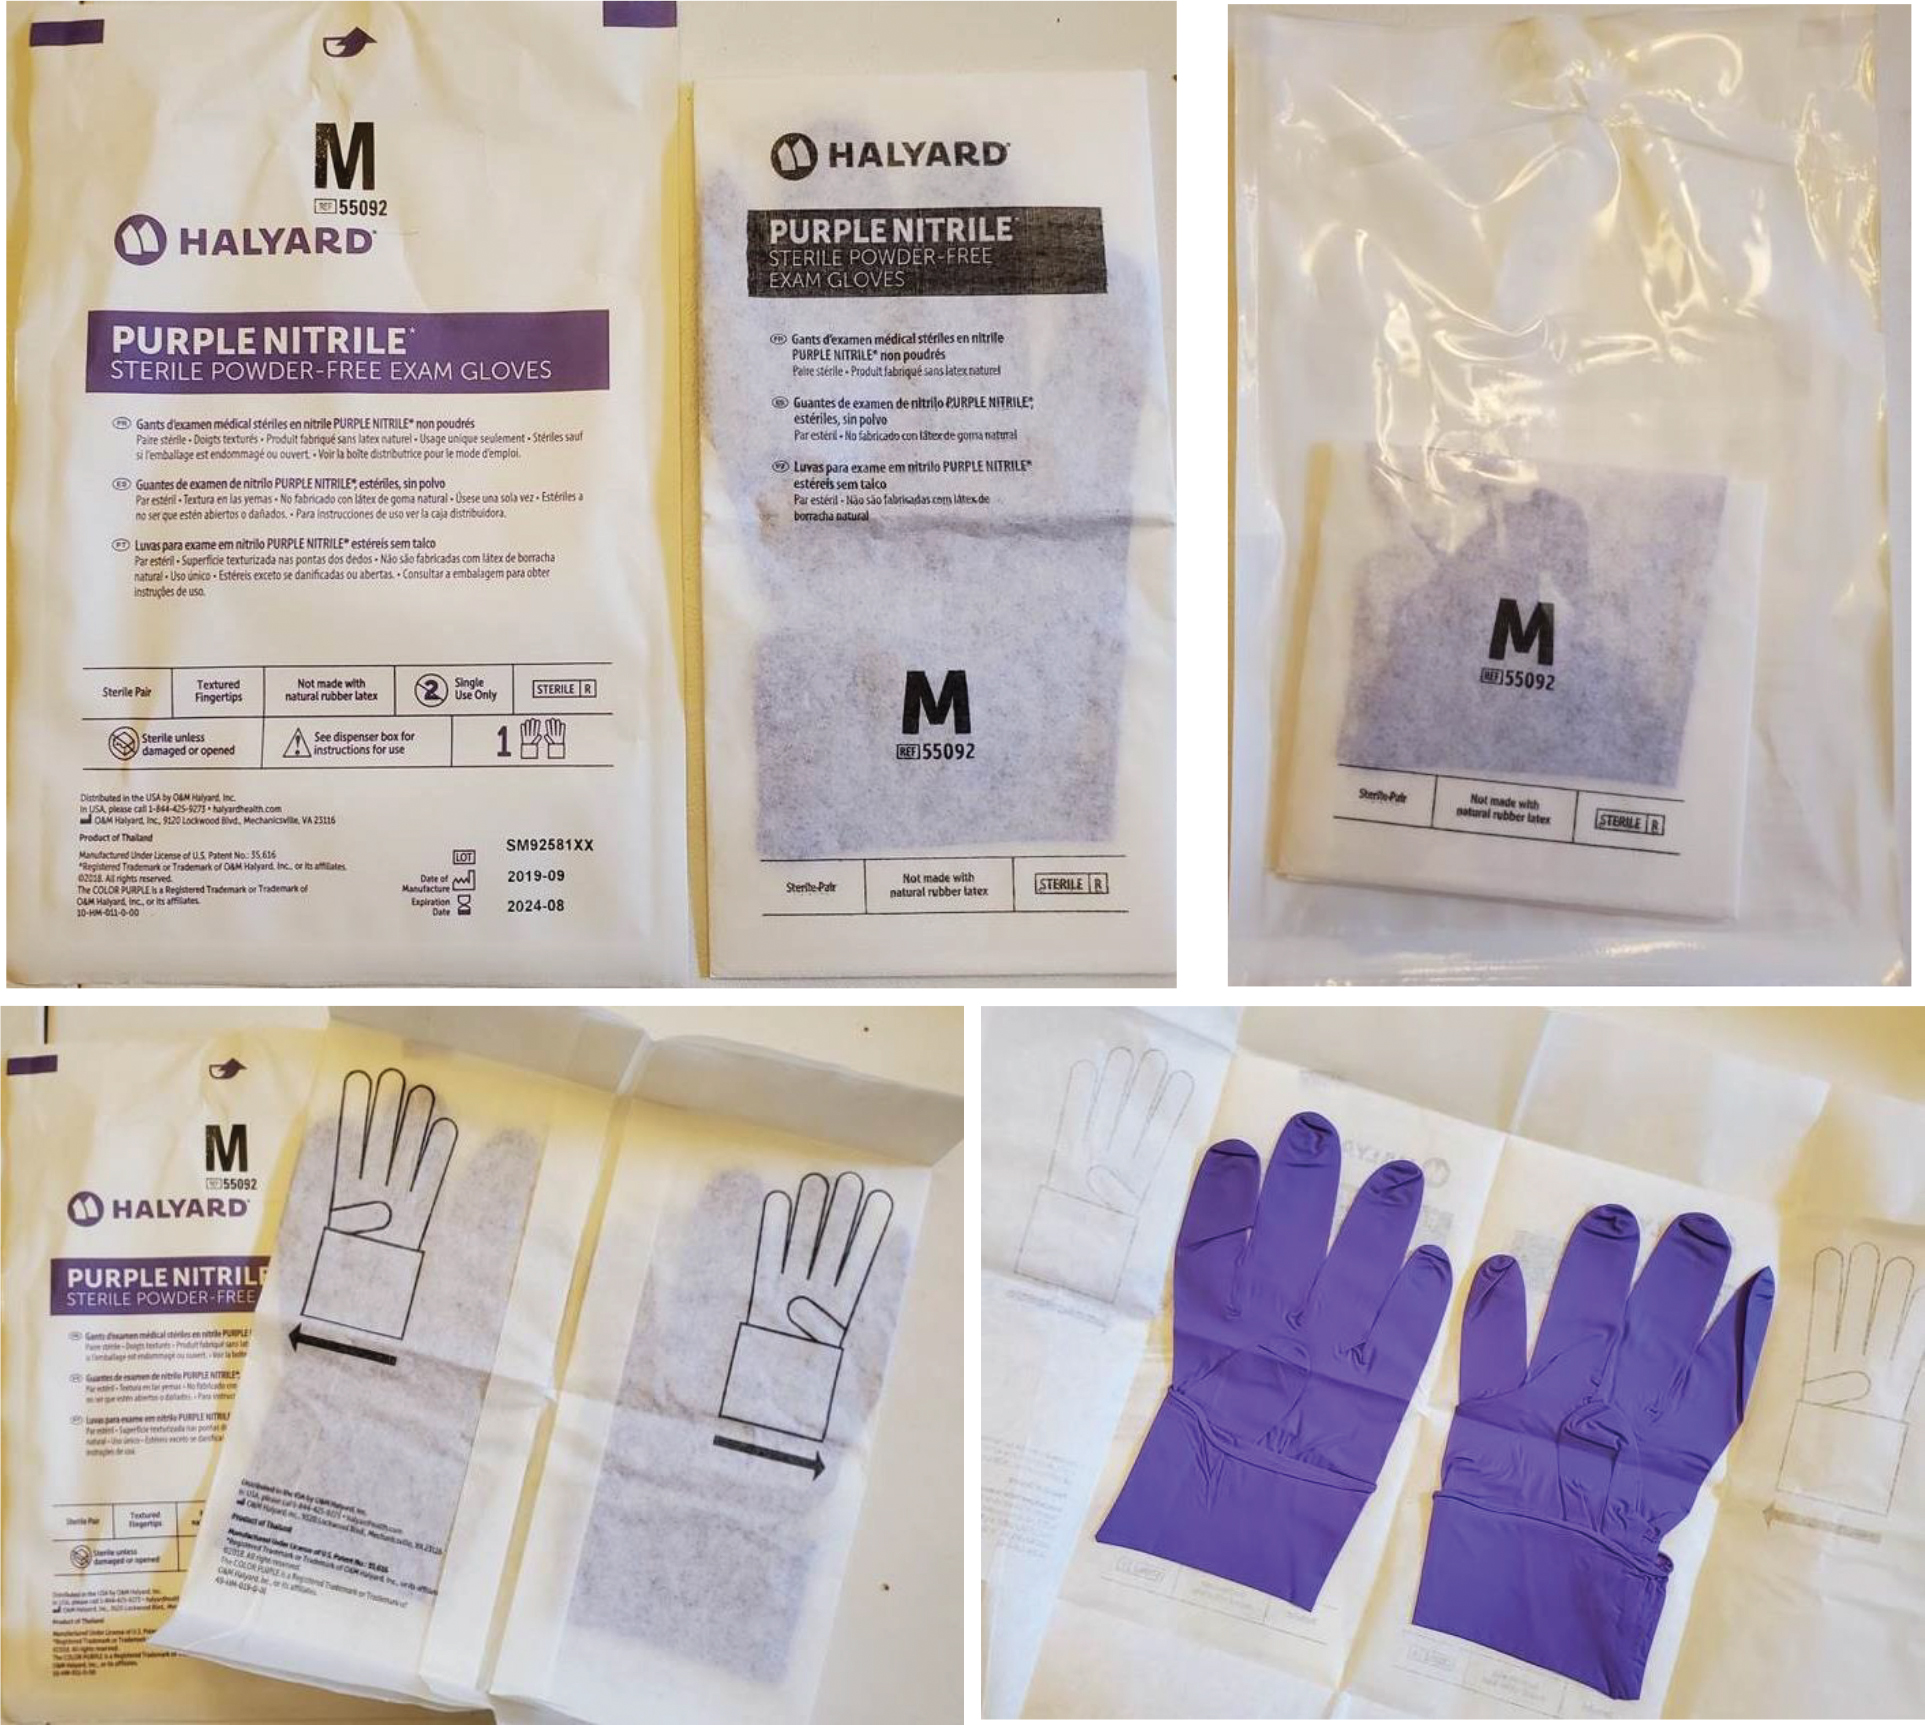
Single pair of sterile gloves for the self-donning glove challenge. If sterile gloves are not available, teachers can present students with regular gloves “packaged” in a sheet of construction paper or white copy paper.
| Table 3. List of materials and sources for self-donning surgical glove challenge. | ||||||||||||||
|---|---|---|---|---|---|---|---|---|---|---|---|---|---|---|
|
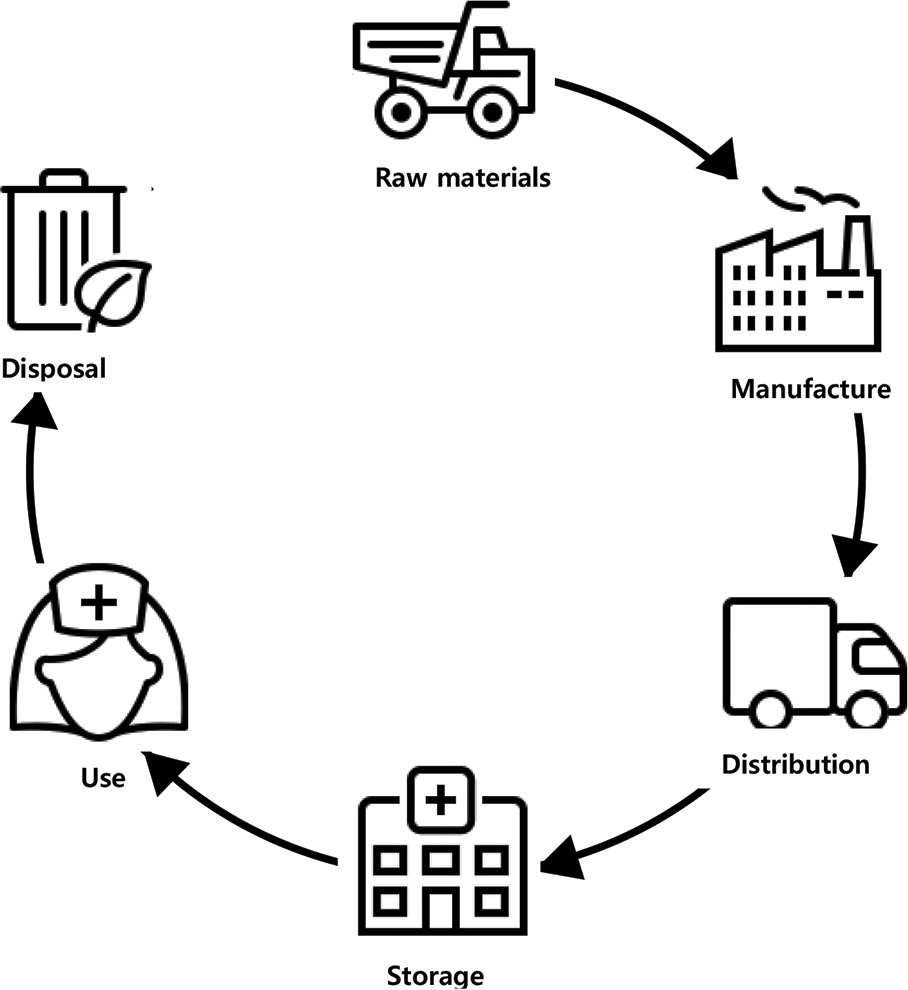
Students should begin to define the criteria needed for a successful design. We generally tell students with little prior engineering experience that criteria are the wants or needs of end users of the design and related stakeholders. Anticipate that students will initially think only about the nurse shown in the video as the end user. However, you want them to think broadly about end users, including the hospitals, patients, and other healthcare providers and stakeholders in the manufacturing and distribution of sterile gloves. We have found that using a product life cycle diagram (see Figure 2) prompts students to think more broadly about end users and stakeholders related to this problem.
Have students work with their team members to come up with a list of criteria, and then have them share with the whole class. Use sticky notes to catalyze this whole-class discussion. Prompt the groups to write each of their criteria on separate sticky notes and bring them to the front board. Then, work with students to sort their criteria into groups. For instance, one group might write “easy to put on by yourself,” another might write “can be donned in less than two minutes,” and a third might write “can be put on by the nurse efficiently.” These three related ideas can be grouped into an easy/efficient to self-don criterion. The same process would be followed for other related student ideas, grouping them into categories, each of which would form one criterion. Once the criteria are agreed on, then we discuss how to set reasonable constraints. Again, for those students unfamiliar with engineering design, indicate that constraints are the limits or metrics they will use to determine if their prototype has met design criteria and also to determine testing procedures for prototypes. A teacher version of the criteria and constraints matrix can be found in Table 4 (see student version of criteria and constraints matrix in Online Supplemental Materials). It is important to discuss criteria and negotiate constraints and testing procedures with students rather than just providing them to students up front. Based on overall aptitude and interest, the criteria and constraints can be limited to two or three, or they can be weighted. For instance, in Table 5, we have weighted the criterion “maintain sterile field” double that of the other design criteria because without meeting this criterion, the prototype would be completely useless. Any weighting scheme can be used (e.g., doubling or reducing by half) so long as the weighting is justified by the needs of end users.
| Table 4. Sample criteria and constraints matrix for the self-donning surgical glove design challenge. | ||||||||||||||||||||||||||||
|---|---|---|---|---|---|---|---|---|---|---|---|---|---|---|---|---|---|---|---|---|---|---|---|---|---|---|---|---|
|
| Table 5. Sample tradeoff matrix for self-donning surgical glove design challenge. Note that we made the first design concept the baseline. | |||||||||||||||||||||||||||||||||||||||||||||
|---|---|---|---|---|---|---|---|---|---|---|---|---|---|---|---|---|---|---|---|---|---|---|---|---|---|---|---|---|---|---|---|---|---|---|---|---|---|---|---|---|---|---|---|---|---|
|
Part II. Generating design concepts (85 minutes)
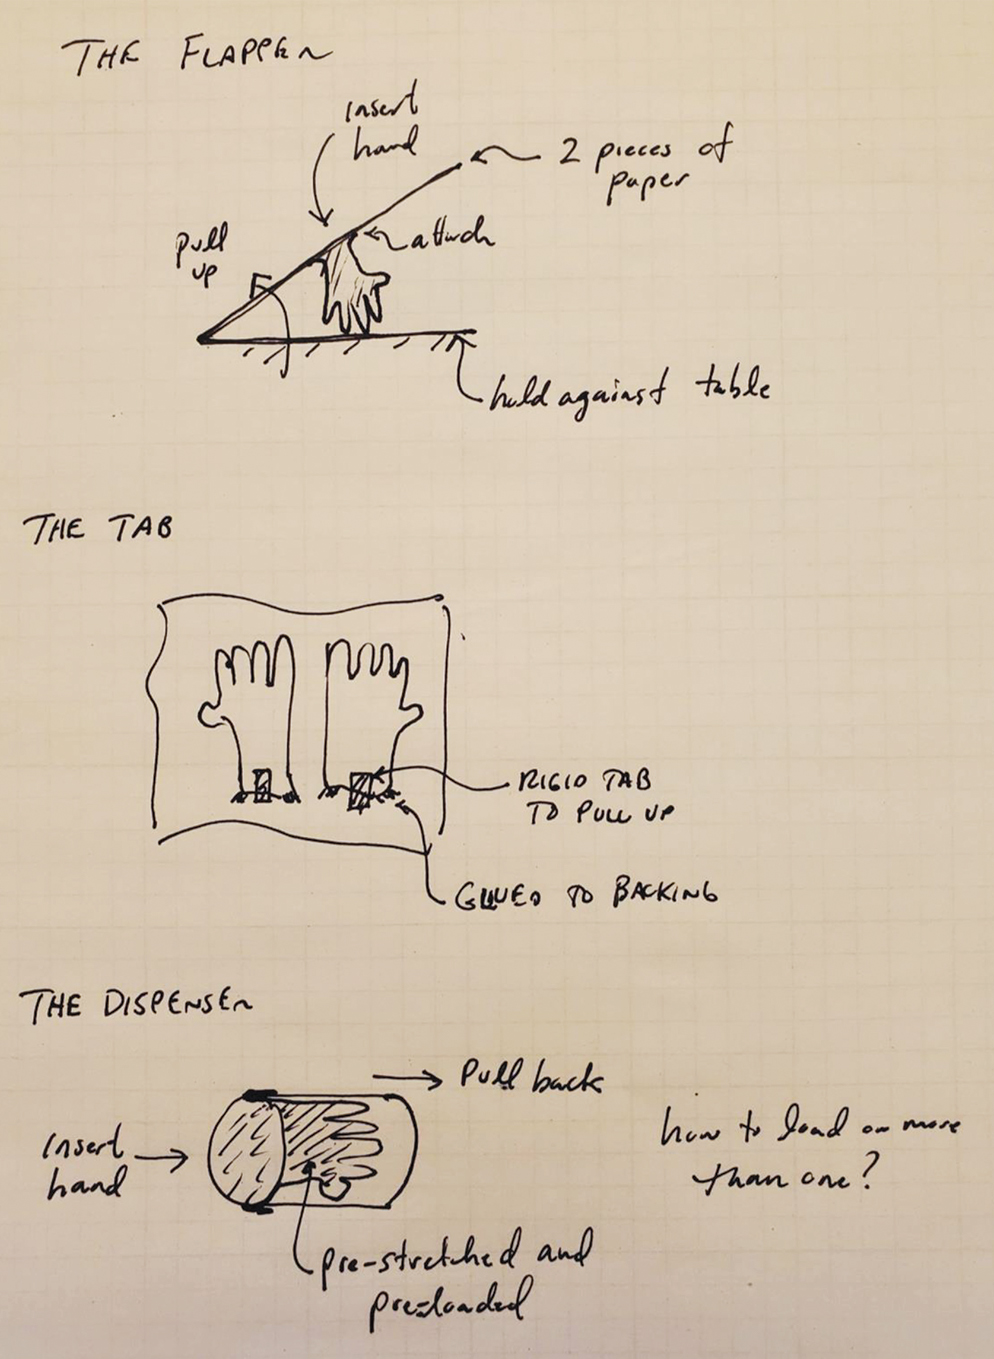
Once criteria and constraints have been determined, ask students to think about how to improve the sterile glove packaging to make it easier for healthcare workers to self-don. Their goal should be to produce at least three unique and feasible design concepts that address the criteria and constraints they collaboratively delineated in Part I. If teams are groups of three, then charge each student with producing at least one design concept. It’s important to generate more than one design concept as it provides an opportunity to weigh the pros and cons of different designs using a tradeoff matrix. Give students sheets of engineering or graph paper to draw and label their design concepts. We realize that not all students like to draw; to overcome this challenge, remind them that their engineering drawings are for communication, not for aesthetic appeal, as they might be in an art class (sample sketches can be found in Figure 3).
Each team member should share their design concept with their teammates, describing the concept’s essential features and how it will meet the criteria and constraints. Only one design concept, however, will be chosen by the group for prototyping. To minimize the chance that students will simply choose the most “popular” design rather than the one most likely to meet the criteria and constraints, show students how to use a tradeoff matrix to more objectively decide which design concept to advance to prototyping (see example in Table 5). Students must construct an argument about how top-ranked design has the best chance of meeting the criteria and constraints (see student version of tradeoff matrix in Online Supplemental Materials). Use this as a formative assessment checkpoint to make sure students are on track in their understanding of the design problem.
Part III. Building and testing prototypes (90 minutes)
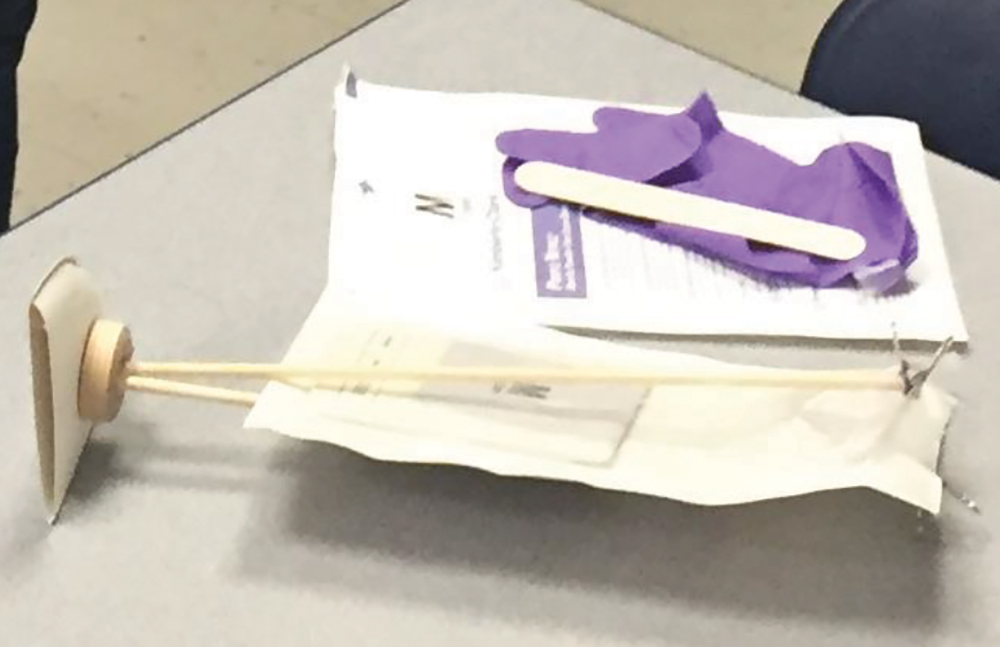
Once student teams have completed their tradeoff matrixes, they should be given permission to begin building their prototypes, which is often the most engaging part of engineering design. Although the previous steps take time, it’s important to model for students that engineers use information to make objective decisions about which design concept is most likely to meet the criteria and constraints. A sample prototype made by our students can be found in Figure 4.
Provide students with a variety of common craft materials, adhesives, and fasteners (see Table 3). Safety note: Students should use care with scissors and other sharp objects. If using hot glue guns, remind students that the metal tip of the glue gun is hot and can burn skin when plugged in. Be clear with students about how long they have to construct their prototype. Give them periodic “time check” reminders about how much time they have left for construction. It’s common for students to get so focused on one part of the design that they don’t complete construction of the entire prototype.
After the construction period is over, provide students with rulers, a balance, and a stopwatch to use when testing their protype. Have them fill out the student design validation table in Online Supplemental Materials. In the two left columns of the design validation table, students should fill in the criteria and testing procedures they agreed on in their criteria and constraints matrix (see Table 4). As students complete tests of their prototypes, they should write their data in the Test Result(s) column. Finally, students should use the data from test results to determine which aspects of their prototype to improve, documenting this in the Ways to Improve column of the table.
You can conduct an optional test with students using Glo Germ powder to check if they have broken sterile field while self-donning their prototype. For the student who will self-don, lightly sprinkle the power on their hands and have them rub it all over both hands. Then allow them to self-don with their prototype. After self-donning, use a black light to check if they have transferred any Glo Germ power to the outside of the gloves. Safety note: Take care when using the black light, as it contains UV radiation and can be harmful when shone directly into a person’s eyes for long periods. During the testing period, have student teams make notes in the design validation table on how they could improve their design.
Part IV. Refining the design (120 minutes)
Have student teams give three- to five-minute presentations on their first-generation prototype by explaining to their peers the essential features of their design and how their prototype did or did not meet the design criteria, especially the criterion of maintaining sterile field by end users. They should also share how they intend to improve the design and, perhaps just as important, allow for their peers to give them critical yet constructive feedback on how they could improve their prototype (see prototype presentation feedback form in Online Supplemental Materials). After each group has presented, hold a reflective session with the students in which they identify the most and least effective aspects of the first-generation prototypes in the class. This type of discussion helps students understand that no first-generation prototype meets all the criteria for success. Remind students both during the construction and peer presentations that design failure is a normal part of the engineering design process and that it is okay for some part of their prototype to fail to fully meet criteria (Lottero-Perdue and Parry 2017). Highlight where one or more groups had difficulty during construction or testing and also highlight how they overcame their challenges. It’s important to show students that design failure can lead to positive outcomes because it provides information about how to improve. Learning from design failure can help students develop a positive growth mindset that can be transferred to learning in other content areas.
Once the team presentations and whole-class reflective debrief is complete, allow student teams to meet again and make a plan to improve their first-generation prototype. Again, be clear how much time they have to plan and then (re-)construct their second-generation prototype. After they have completed this round of prototyping, they will again test the prototype using the same procedures they used for their first-generation prototype.
As a follow-up to this lesson, consider showing students a TED Talk titled “A tool to fix one of the most dangerous moments in surgery” (see Resources) about how engineering is used to solve other healthcare problems. We believe it’s important to show students how engineers work with everyday objects to solve real problems faced by humanity. Even this engineer’s first prototype was made from popsicle sticks!
Assessment
Assessment during this lesson can occur at a variety of points. During design concept generation (Part II), rotate among student groups and ask probing questions such as, “Tell me about your design. How will the features of the design meet the criteria?” and “What purpose will this feature of your design serve? How does this design feature work with others in your design?” These questions will allow you to formatively assess students’ understanding of the design challenge (see implementation notes and pedagogical strategies in the detailed lesson plan in Online Supplemental Materials). Once student teams have chosen a design concept to prototype, ask them to turn in their completed tradeoff matrix with written justification for their first-generation prototype as a formative assessment (see tradeoff matrix rubric in Online Supplemental Materials). Another way to formatively assess students is to require student teams to take notes from class presentations and then show how they will use feedback to generate their second-generation prototype. These notes can be documented in their design validation tables.
As a summative assessment, after they have completed their second generation prototype, ask them to write a short design brief that includes a description of the features of the second-generation prototype, how they used data from the first-generation prototype to improve the design, data from testing the second-generation prototype, and an explanation of how the second-generation prototype did or did not meet criteria. Last, students should include in their design brief how they could improve the second-generation prototype. For design brief guidelines and rubric, see Online Supplemental Materials.
Resources
Procedural video for self-gowning
Video with no narration of medical professional self-donning sterile gloves
TED Talk: “A tool to fix one of the most dangerous moments in surgery”
Online Supplemental Materials
Design brief guidelines and rubric
Prototype presentation feedback form
Student design validation table
Student version of criteria and constraints matrix
Student version of tradeoff matrix
Amy E. Trauth (anare@udel.edu) is the science instructional coach at New Castle County Vo-Tech School District in Wilmington, Delaware and affiliate faculty in the Department of Mechanical Engineering at the University of Delaware in Newark. Jenni M. Buckley is an associate professor in the Department of Mechanical Engineering at the University of Delaware in Newark.
Careers Engineering Instructional Materials Interdisciplinary Life Science Middle School