![]()
![]()
Integrating Technology
Sphero Robots and the Periodic Table
Science Scope—April/May 2019 (Volume 43, Issue 4)
By CHRISTINE HERALD

Students review the periodic table by coding robots.
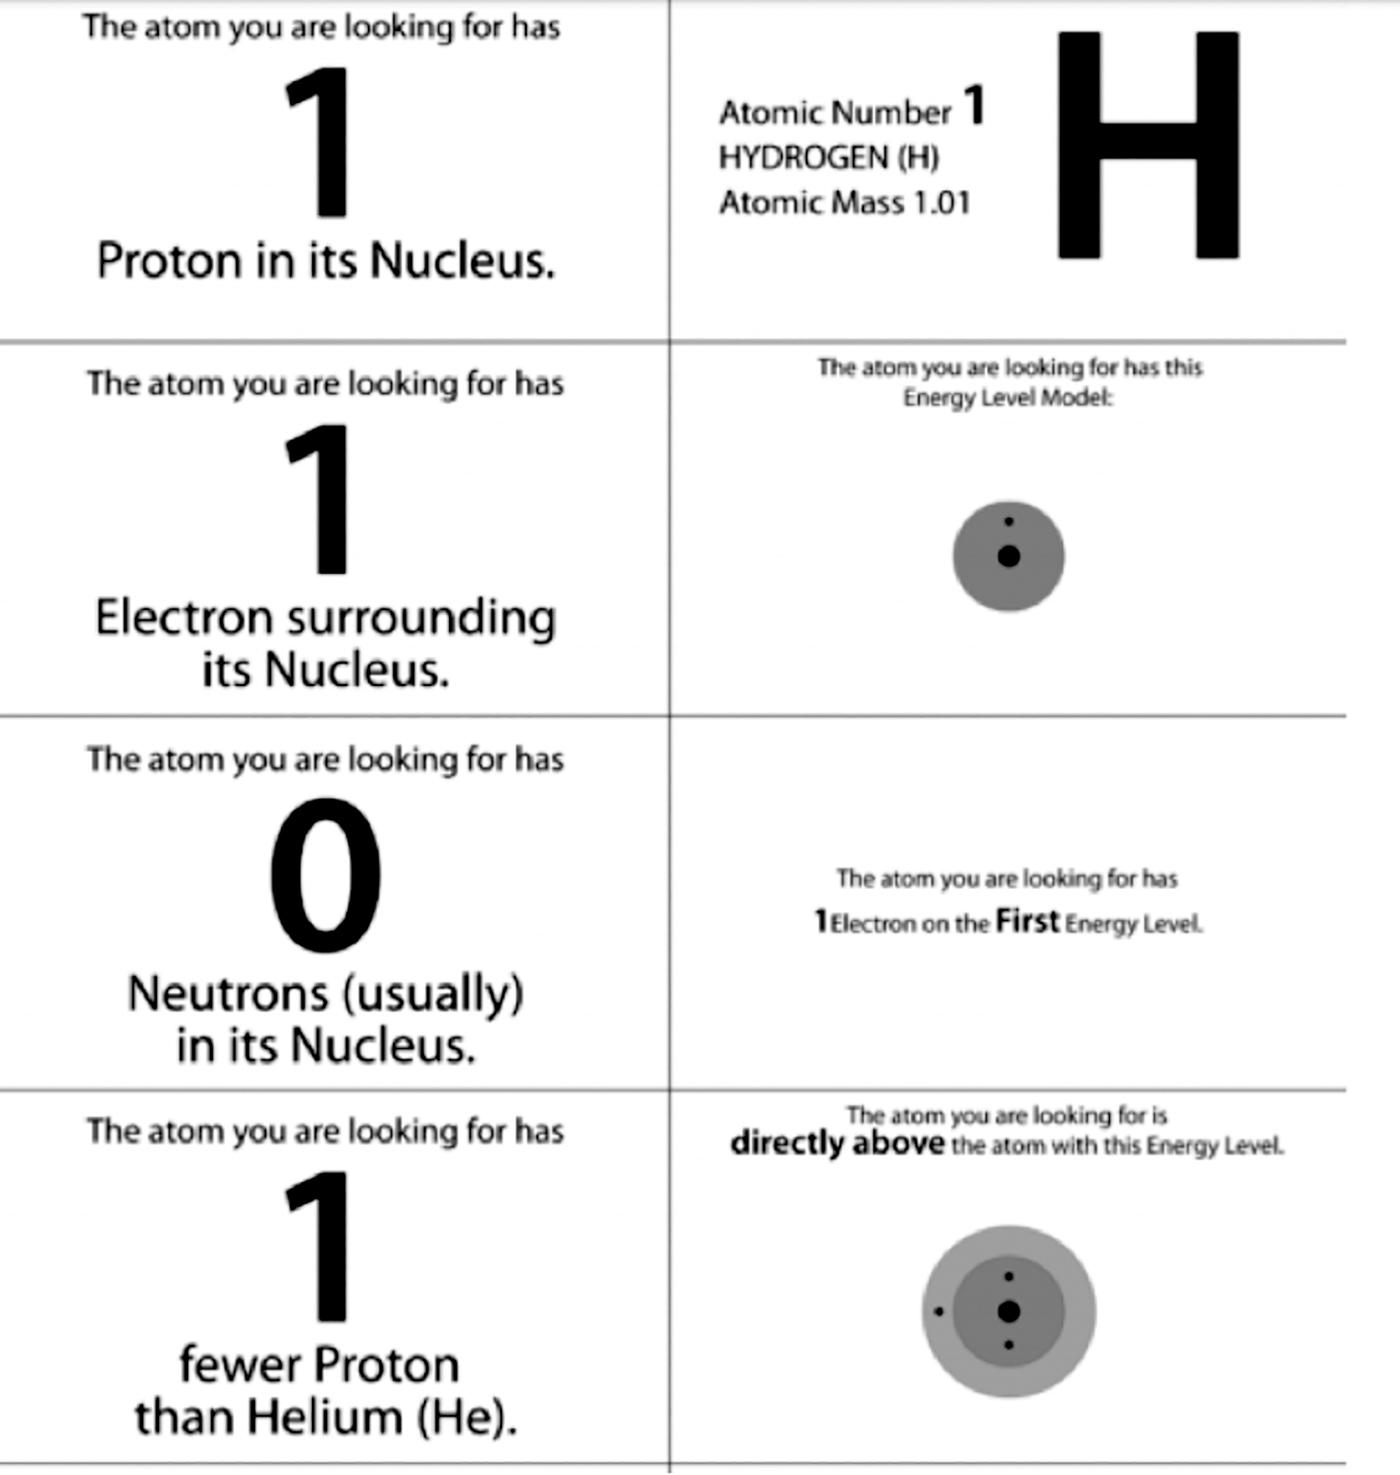
I returned to the classroom after five years as my district’s STEM (science, technology, engineering, and math) coordinator to teach a new physical science course at the local high school. Watching students embrace new technology in my prior position encouraged me to design new exercises using a variety of technology. The goal of the hands-on activity described in this article is to give even low-level chemistry students the opportunity to program robots around the topic of the periodic table and review basic facts about elements. As we prepare our students for the 21st century, lessons such as this one give students the chance to collaborate, communicate, and critically think. This idea could also easily be used in fifth- through eighth-grade classrooms by changing the clues on periodic table cards freely available on the American Chemical Society website (see Resource to download the element cards; see examples in Figure 1). These cards are one of the materials used in the activity.
Our high school follows a modified block schedule and the robot periodic table activity was done during a 55-minute class period. I chose to conduct the experiment in the library because of the additional adults available to supervise my students and aid in checking students’ programs. These adults also have some experience using Sphero robots. Without an extended class period, this lesson could be shortened to fit into a 45-minute class period or separated into two class periods.
Overview
We initially discuss students’ experiences with coding and where robots are used in the real world (e.g., vacuums, lawn mowers, hotel greeters, auto industry). Then, students are given the chance to program a robot in my classroom. Many of my students had used Lego Mindstorm NXT or EV3 robots and Sphero robots prior to my class in their fifth- and sixth-grade classrooms (see Figure 2). Sphero robots are small, sphere-shaped robots that move depending on the commands programmed with an app. Sphero robots are much easier to program than LEGO robots. One reason for this is the drag-and-drop feature in the app that allows students to touch the screen and drag a command to the list of motions the robot will perform. Also, the free Sphero Edu app can be used on any device that has Bluetooth capabilities.
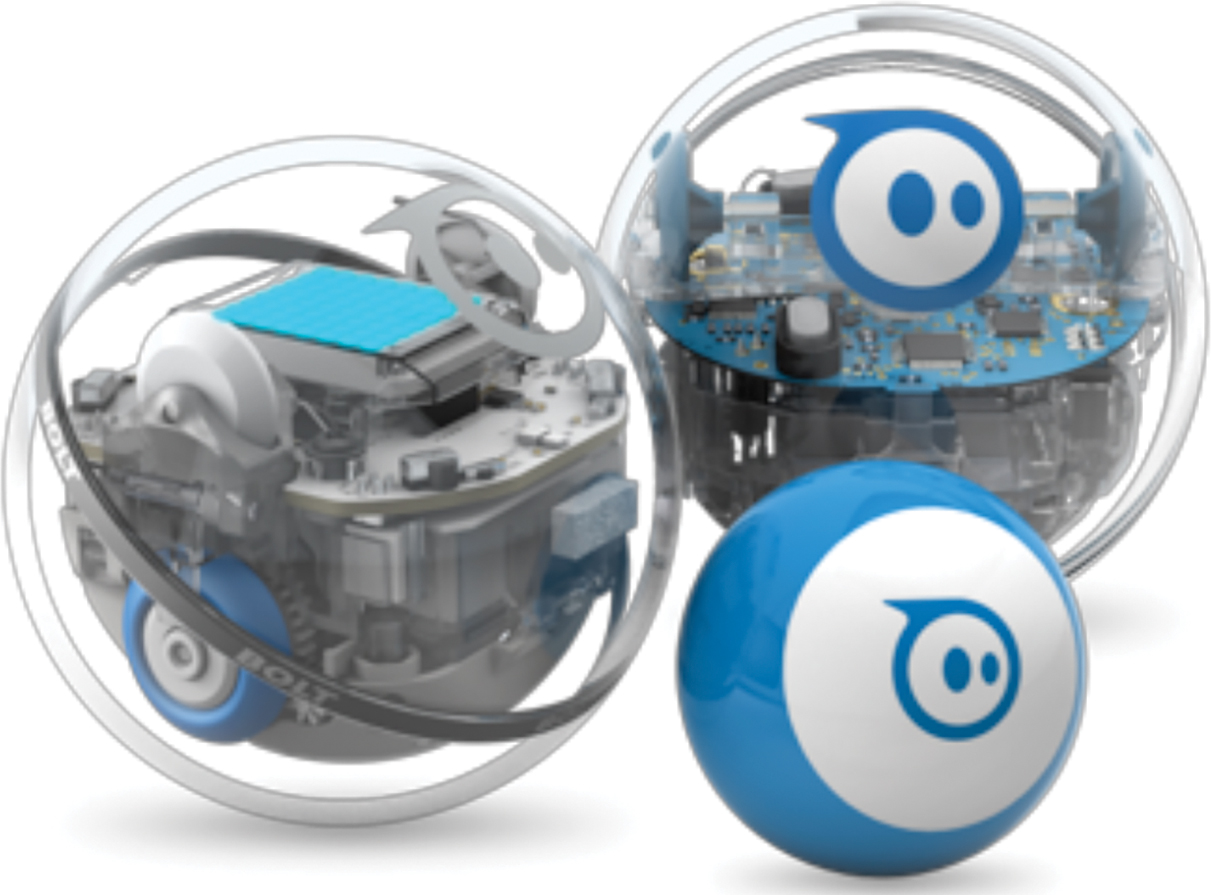
I am lucky to have access to enough Sphero robots from the librarian, other teachers, and the district STEM office to allow students to work in pairs. My largest class needed 14 robots. The cost of one SPRK robot is $130. Sphero also carries other robot models, such as the Ollie at $79.99 and the Mini at $50. Any of these models, or Lego robots, would be sufficient for the lesson. If you are looking to buy a classroom set, organizations such as are a good avenue to pursue. Your science department might be interested in buying a few each year or even asking local businesses to donate money to implement coding skills.
With one robot available in each corner of the room, my students worked in pairs to program a Sphero to roll forward, backward, and then turn 90°, while others worked on a chemistry assignment. Each pair needed about 10 minutes to accomplish this coding task (see Figure 3) because the drag-and-drop program on the Sphero Edu App is easy to figure out. Students could use their phone or a classroom tablet to code because the app will work on any device (see Figure 4, p. 57, for a screenshot of the app with several lines of a program added).
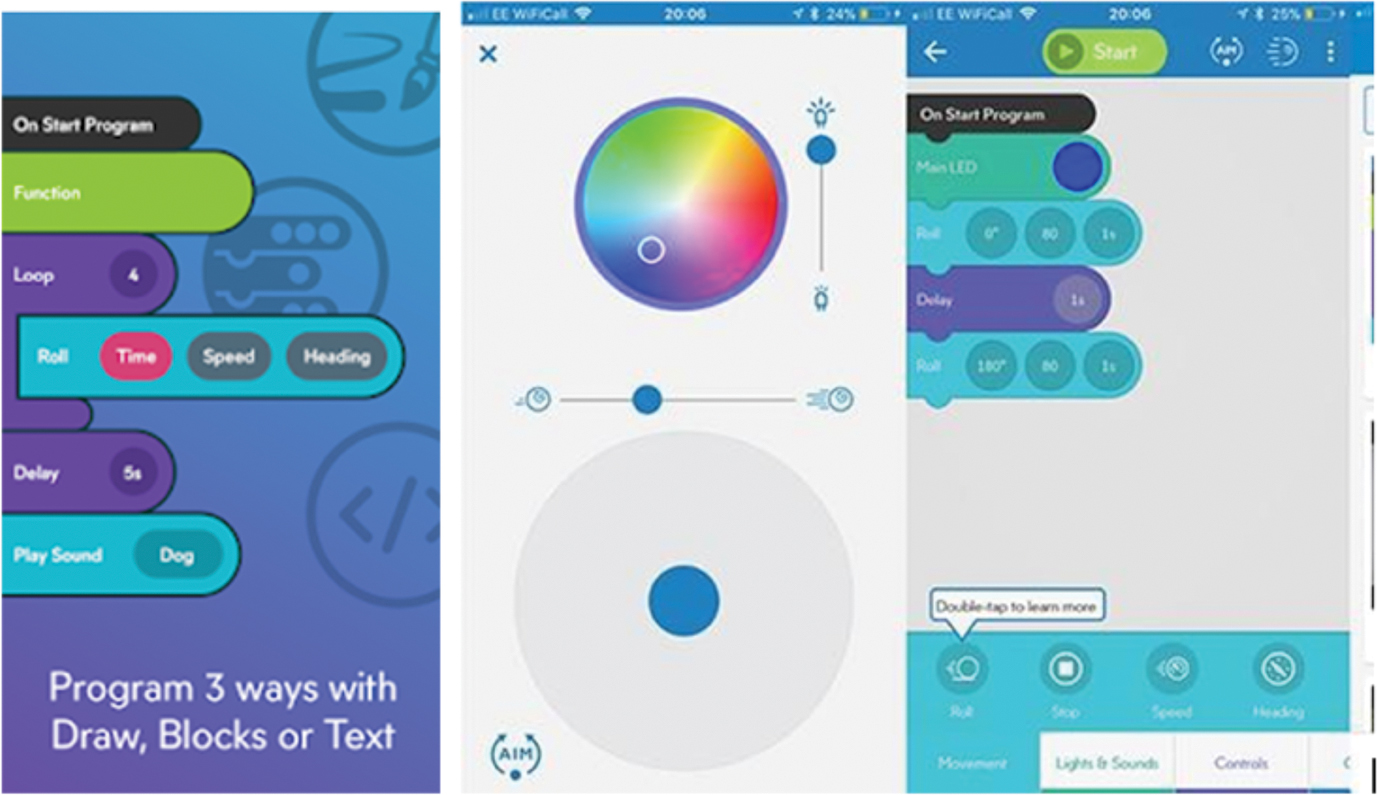
To use the program, the first block, “Roll” (aqua-colored block shown in Figure 4), is dragged to the programming pad. This block has three functions required to move the robot: time, speed, and heading. Before the robot actually moves using a coded program, it is placed on the floor to determine its direction. A light will turn on when students tap “Aim,” and they rotate the robot so that the red light is facing at their feet. Once the robot is headed in the right direction, students press “Start” at the top of the screen. I suggest that the speed be any number below 50. Students use a trial-and-error method to find the three numbers (time, speed, heading) that produce the results they want: moving the robot forward and backward and making it turn (see Online Supplemental Materials for student direction sheet). Once they feel successful in programming the robot, students move back to their desks to allow another pair to experiment with the robot.
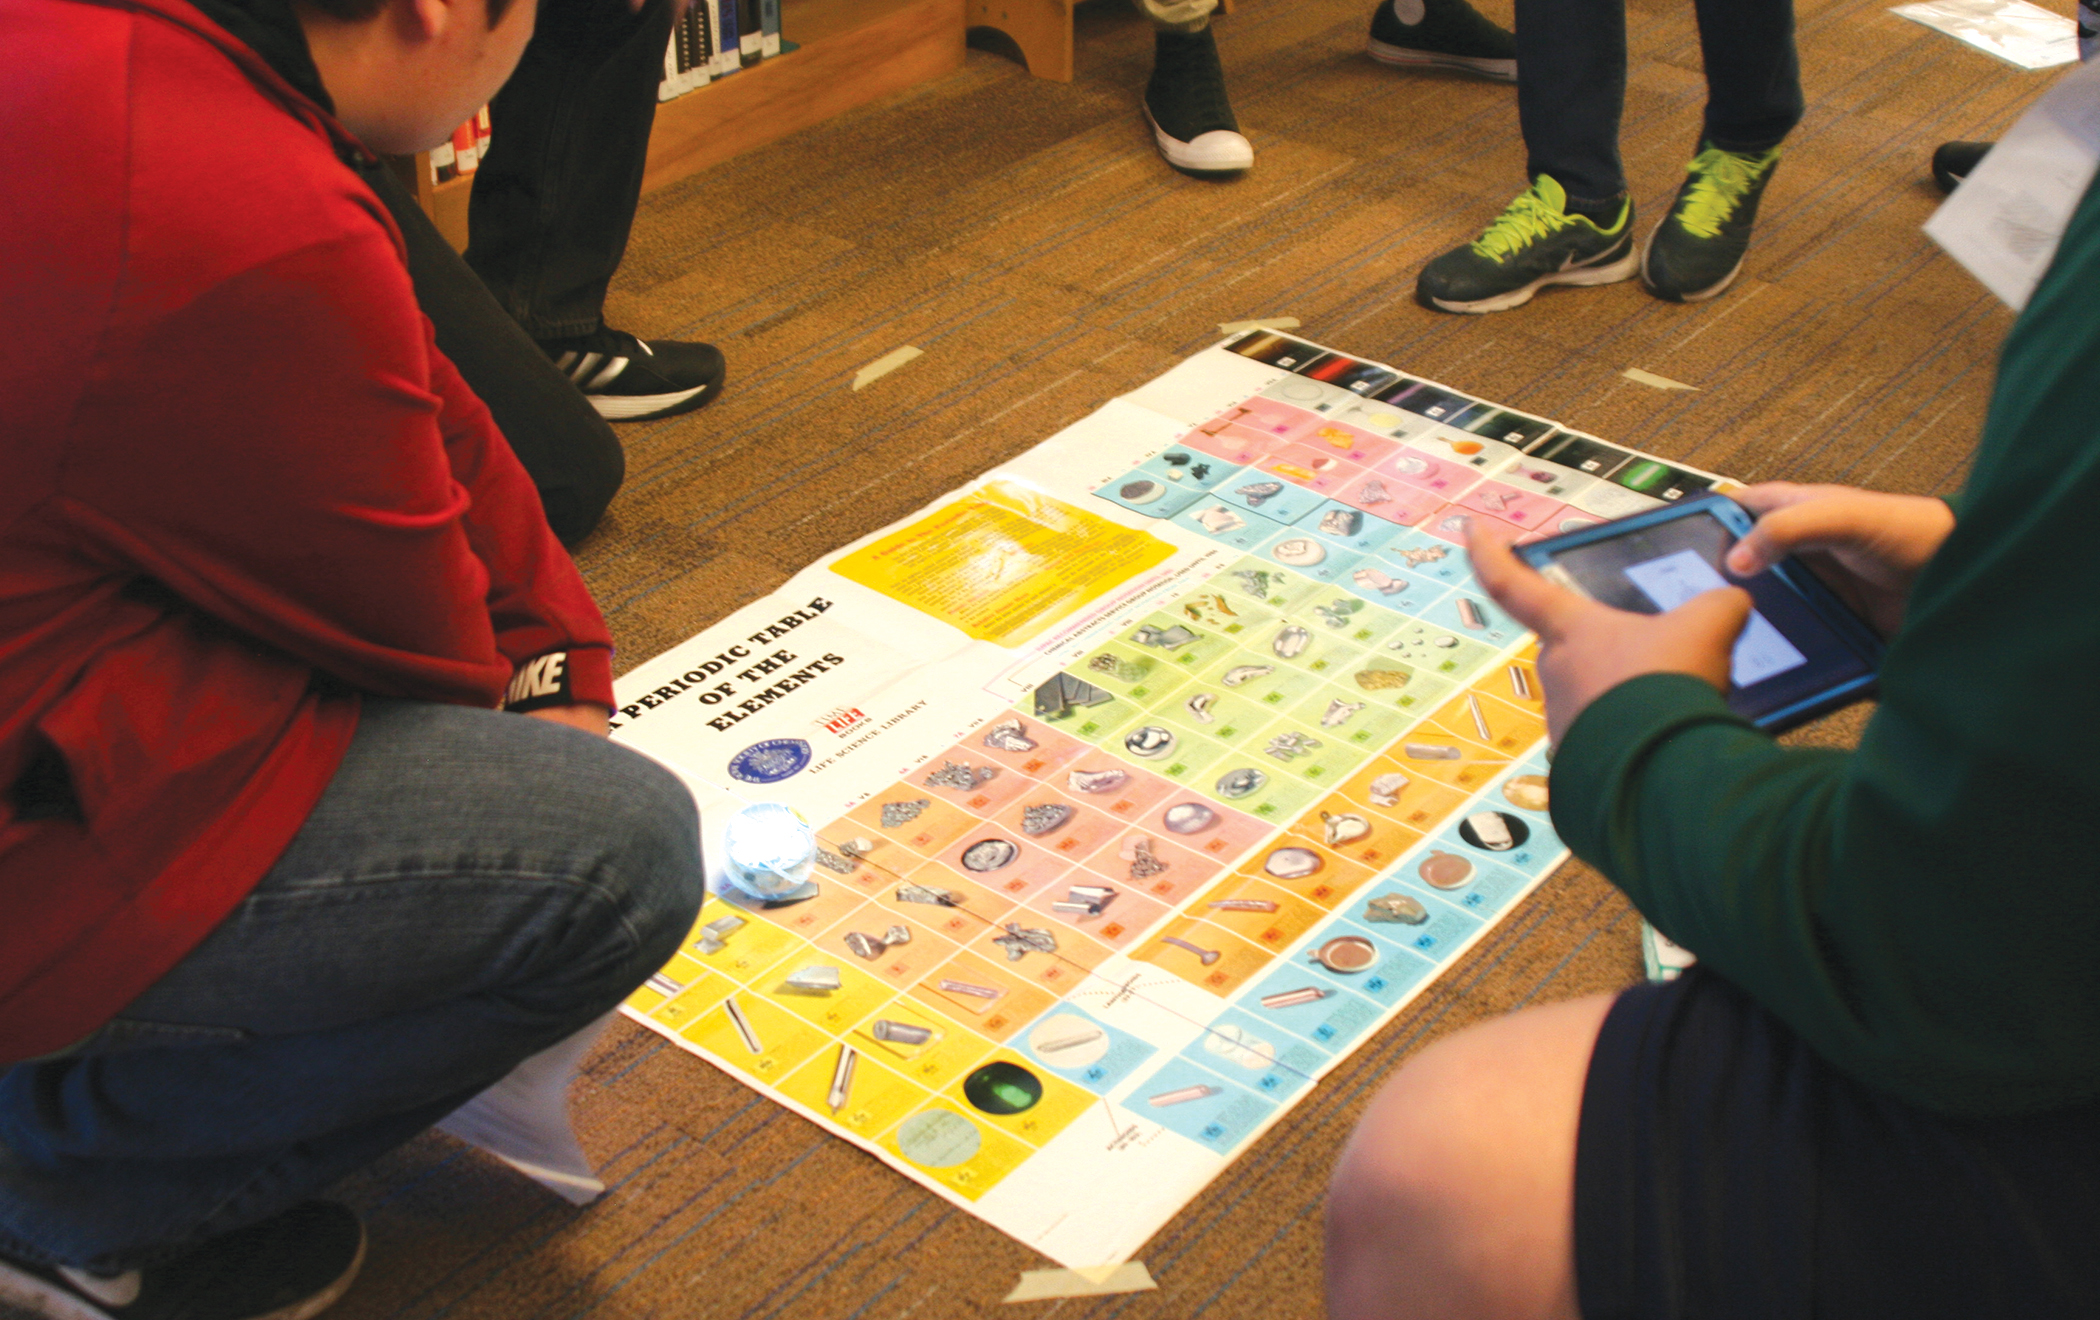
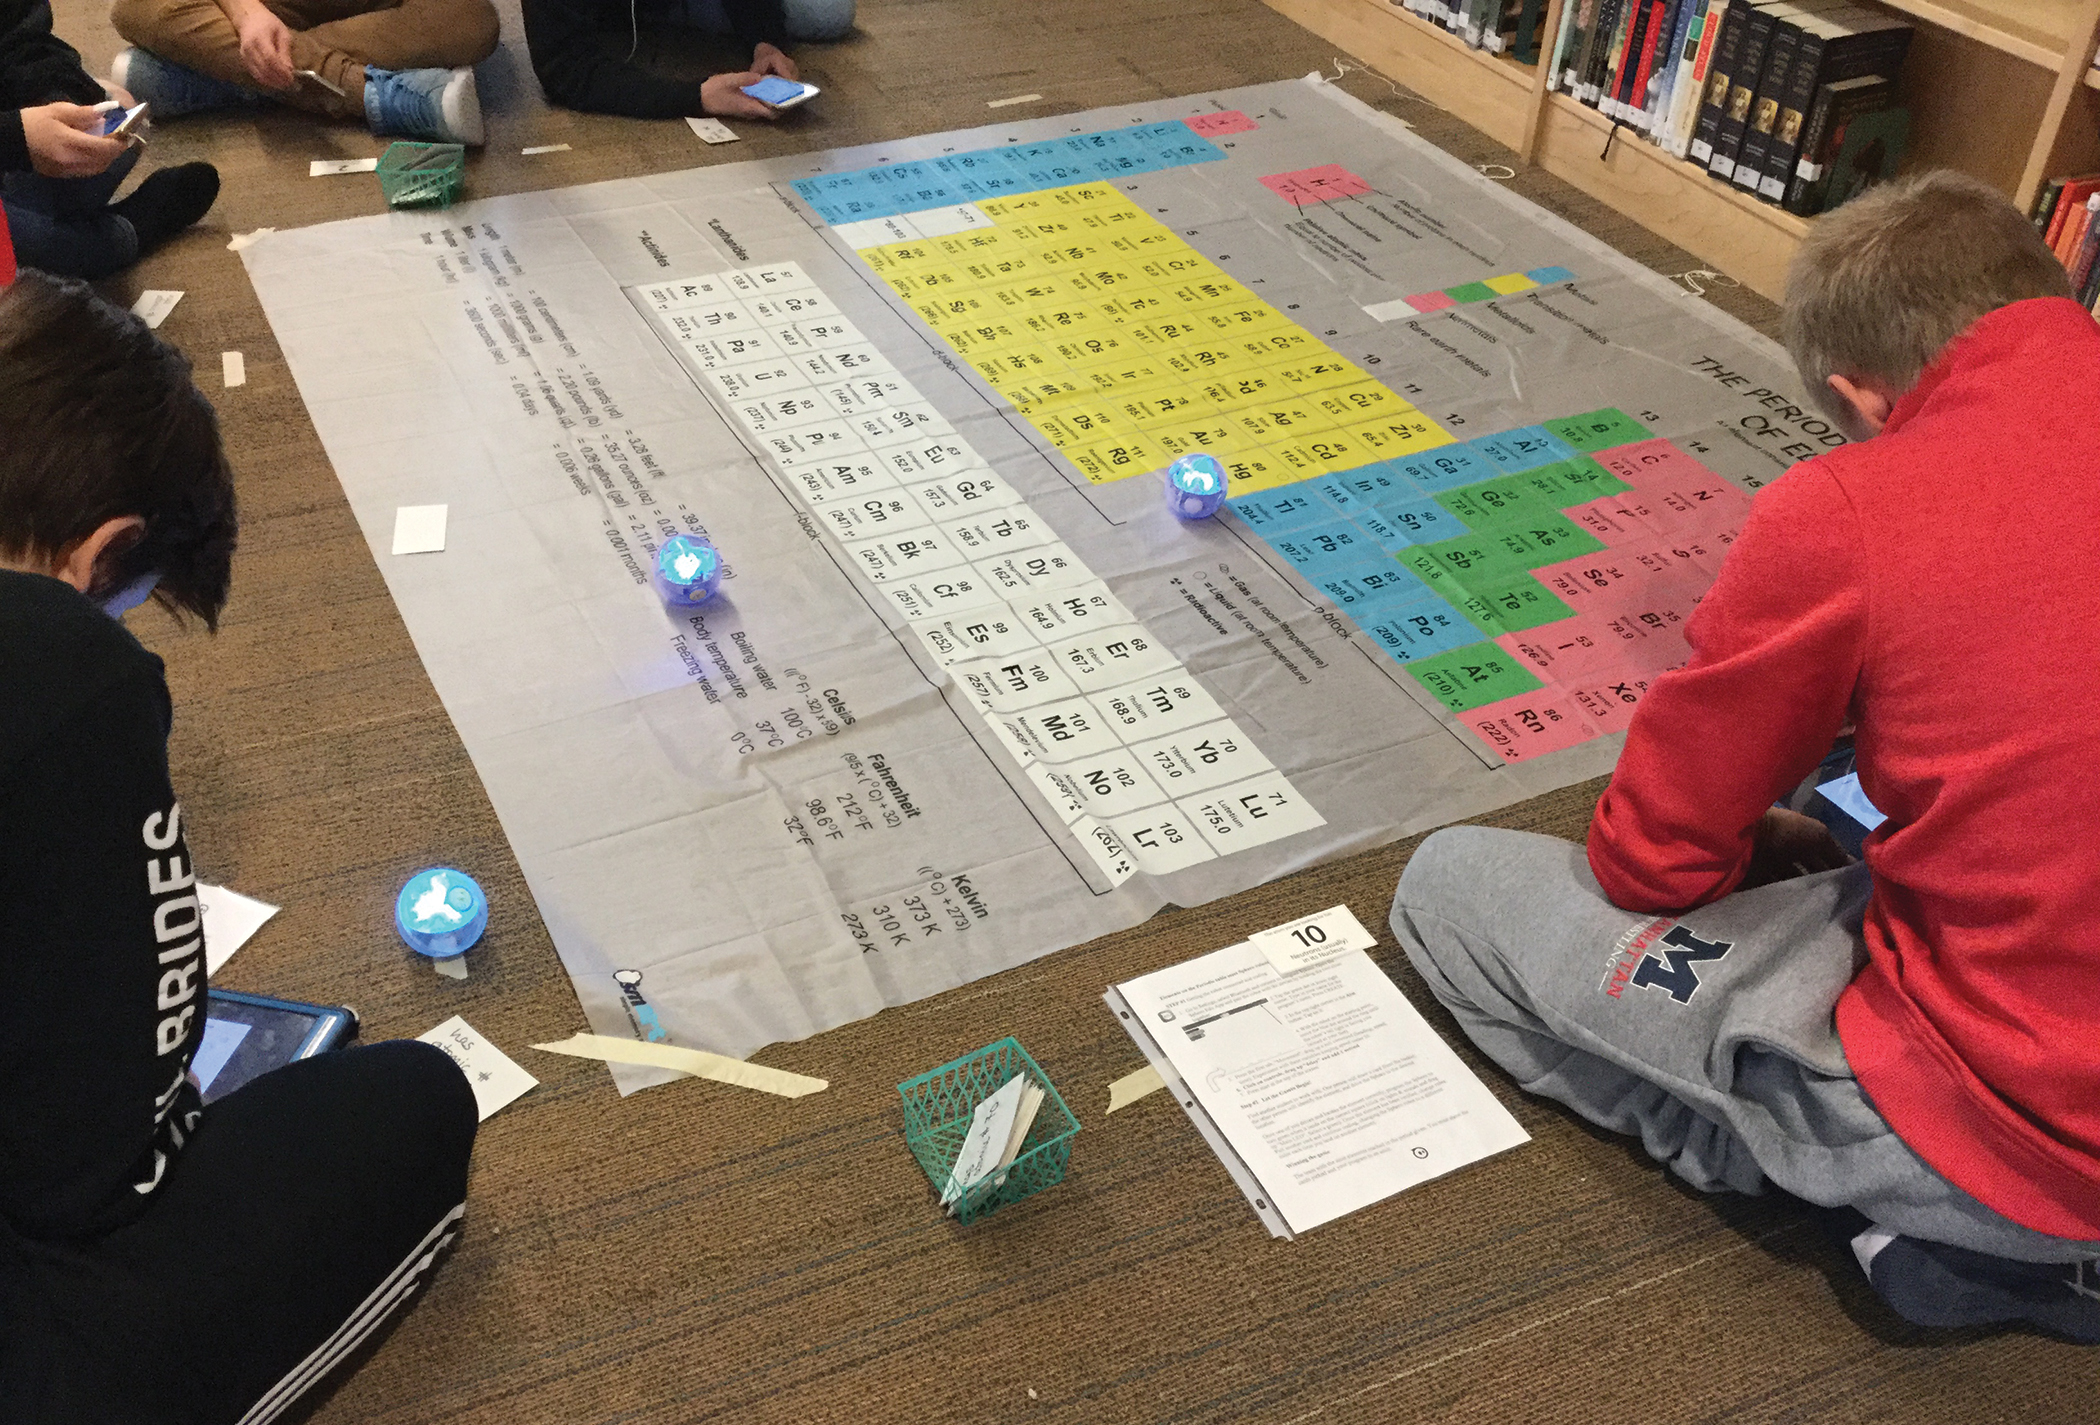
On the day of the periodic table activity, students meet in the library, pick up a tablet connected to a specific robot (or their phone), and pair up with another student. All robots are placed on the starting line outside one of the large periodic tables placed on the floor. Only four pairs could position themselves around the smaller, poster-size periodic tables. The large periodic table on the shower curtain had six pairs of students arranged around it (see Figure 5). Students then pick an element card from a provided basket. Students determine which element a clue on the card refers to, which is the element the robot needs to travel to from its starting point outside the periodic table. To be successful, the robot has to reach the assigned element by following the required program steps (no driving it with a finger!). Some of my students just used a trial-and-error method, whereas others determined the speed and distance required to get to the element’s square. Once the robot lands on the correct square, it should be programmed to change color by dragging a block labeled “Light” into the lines of code. I move around to each pair of students, questioning their methods, checking whether they have questions, and allowing pairs to help each other, if needed. Successful students move the robot back to start, pull another card, and add more steps to their first program.
Some pairs were able to work without much guidance from any adults. Others needed a reminder to read the instructions or look at the pictures for each step. For better classroom management, I placed the periodic tables far apart and assigned only a few groups to each area. Students work at their own pace. Some of my pairs only managed to program the robot to move to one element by the end of class, whereas others successfully moved their Sphero to four different elements.
The adults ask students how they moved their robot to the next element. Cleanup occurs with five minutes left to the class period. Devices are placed on a library table and robots are put back on their chargers next to their paired device. Groups whose robot reaches the highest number of elements win a periodic table bookmark. With my smaller classes, I was able to evaluate pairs of coders by asking how they modified their programs and what they learned about the periodic table.
The day before the programming activity, I gathered supplies and put them on a cart in the library. These materials included metersticks (after their first trial, some students used ratios to determine the distance the robot rolls), printed direction sheets (see Online Supplemental Materials) in protective sleeves for each pair of students, a set of clue cards in a basket for each area, masking tape, large periodic tables, and labeled robots already paired to a tablet (students could also use their phones). Before classes began on the day of programming, I taped several large periodic tables on the floor far enough away from each other so that the robots would not be connected to the wrong tablet.
- Remove a labeled Sphero from the charger.
- Shake Sphero awake. A double-tap will usually work. Your Sphero will flash three consecutive colors when it is awake and ready to pair.
- Access the tablet’s Bluetooth settings. Make sure Bluetooth is enabled.
- Wait for the tablet to detect your Sphero. When it has detected your Sphero, select the robot for pairing. This usually takes less than 30 seconds, but it can take up to two minutes.
The periodic table printed on a shower curtain (about $20 on the internet) was more practical than the smaller posters because it was larger (70 in. × 70 in. [178 cm × 178 cm]), so more groups could use it at the same time. I only allowed four groups to use the smaller posters, whereas the large shower curtain could have six pairs moving their robot around the periodic table. My classes had over 20 students, so we needed more than one periodic table on the floor. Six pairs of students was the maximum number at each periodic table (see arrangement in Figure 5). Each group was assigned one of three starting points, each represented by a 5 cm piece of masking tape, outside the periodic table. Each area also had a basket of element clue cards. I added a number of additional cards to the baskets because this American Chemical Society set only focused on elements 1–20; I knew the robots needed more room to roam so that robots could visit a wider area (higher-numbered elements) and would not crash into each other (you could have students create the cards if time allows). Depending on your students’ background, the clues can be modified from the ones given on the American Chemical Society website. My students were familiar with the following chemistry terms: period, group, electrons, protons, neutrons, atomic mass, atomic number, electron level, and chemical symbol.
Conclusion
A change in classroom routine took my students to the library to program robots around the topic of the periodic table. This minds-on, hands-on problem had all students engaged in tackling the problem of moving a robot to specific elements on a periodic table located on the floor. Students had to communicate and work together to solve the task. They could use a variety of methods to arrive on the element square and showed their success by changing the color of the robot. Not one student (English language learner, special needs, gifted, low self-esteem) felt the challenge was too difficult, and those who loved the challenge were able to move the robot to numerous elements. If I teach this lesson again, I will have my assisting adults ask students specific questions during the class period to demonstrate student learning (e.g., “How did you decide on which speed to select?” “How could you use a meter stick to aid you?” “How did you modify your program?”). This activity would be a perfect problem for even a higher-level chemistry class to tackle the day before a break. In addition, a discussion of STEM careers focused on coding and robots would be a nice modification.
Chemistry Technology Middle School