![]()
![]()
Engineering Encounters
STEM-ify Me: It’s Elementary! Designing Butterfly Wings
Fifth graders’ investigations and design of model butterfly wings with the maximum lift force.

Engaging students in designing, testing, and revising engineering models using mathematical representation of data from scientific investigations helps them embody the science and engineering practices highlighted in the Next Generation Science Standards (NGSS Lead States, 2013). The practices of modeling, conducting failure analysis, and participating in evidence-based reasoning allow students to engage in engineering design processes beyond simple trial and error methods in solving a problem (NRC 2012; Bybee 2010).
This article describes a unit conducted with fifth-grade students, applying Engineering is Elementary’s (EiE) engineering design process or EDP (Ask, Imagine, Plan, Create, and Improve) to explore the lift force of a butterfly wing and the variables that influence it. EiE, a project of the National Center for Technological Literacy at the Museum of Science in Boston, consists of curriculum units designed to foster engineering design thinking in elementary school children. The units are typically structured in lessons that include: (a) a story that introduces an engineering challenge and career, (b) a context for students to collect scientific data, and (c) an engineering design challenge applying the evidence gathered from the analysis of data.
Thirteen public school students participated in this project as part of their gifted and talented enrichment program. The key concepts addressed included: (a) forces interact to influence how objects move, (b) a variety of variables can impact the forces that objects react to, and (c) variables can be studied to create a better design (NGSS Lead States 2013). The instructional activities in this unit (adapted from Science Buddies: Butterfly Wings: Using Nature to Learn about Flight) were comprised of four 90-minute lessons, including an introduction, science investigations, an engineering design challenge, and a reflection. A fifth lesson may be needed to fully explore the design challenge. Individual lessons are described in detail below
Students’ Prior Knowledge About Forces
In this unit, students were to engineer butterfly wing designs that would produce the most lift based on evidence gained through investigations. While this can be taught as a stand-alone unit, we used it to incorporate engineering design into our fifth-grade science curriculum unit on Forces and Motion (taken from the Full Option Science System). Students had previously investigated the variables that contributed to the speed of a rolling ball and demonstrated an understanding of the basic concepts of forces, including the pull of gravitational force, balanced forces on a stationary object, and surface friction that resists the motion of an object.
Teacher-made materials prior to the first lesson:
- Butterfly stands (angles 0, 27, 45, 72, 90). Each butterfly stand uses nine craft sticks. We used hot glue to hold them together and we used a protractor to measure the correct angle for each. You will need four 45° stands, and one each of 0°, 27°, 72° and 90°. This will provide you with one full set of all angles for the variable group testing angles and one 45° for the each of the other variable groups. For your safety, use hot glue with caution. You may also use wood glue instead of the hot glue.
- Butterfly templates. Use the templates from the Science Buddies (see Internet Resources) to create four 100% size monarch wings on cardstock and one each of glasswing, orange aeroplane, four bar swordtail on cardstock. This will provide you with one full set of all species for the variable group testing type of species and one monarch for the each of the other variable groups testing scale, material, and angle. In order to help students, create the different scales of the monarch butterfly, use a photocopier to make a cardstock copy of the 100% monarch, reduced copy to 67% and enlarged copy to 155% .
- Prepare the bins with materials for each group (see NSTA Connection). Note that students may need additional materials if they would like to test additional variables.
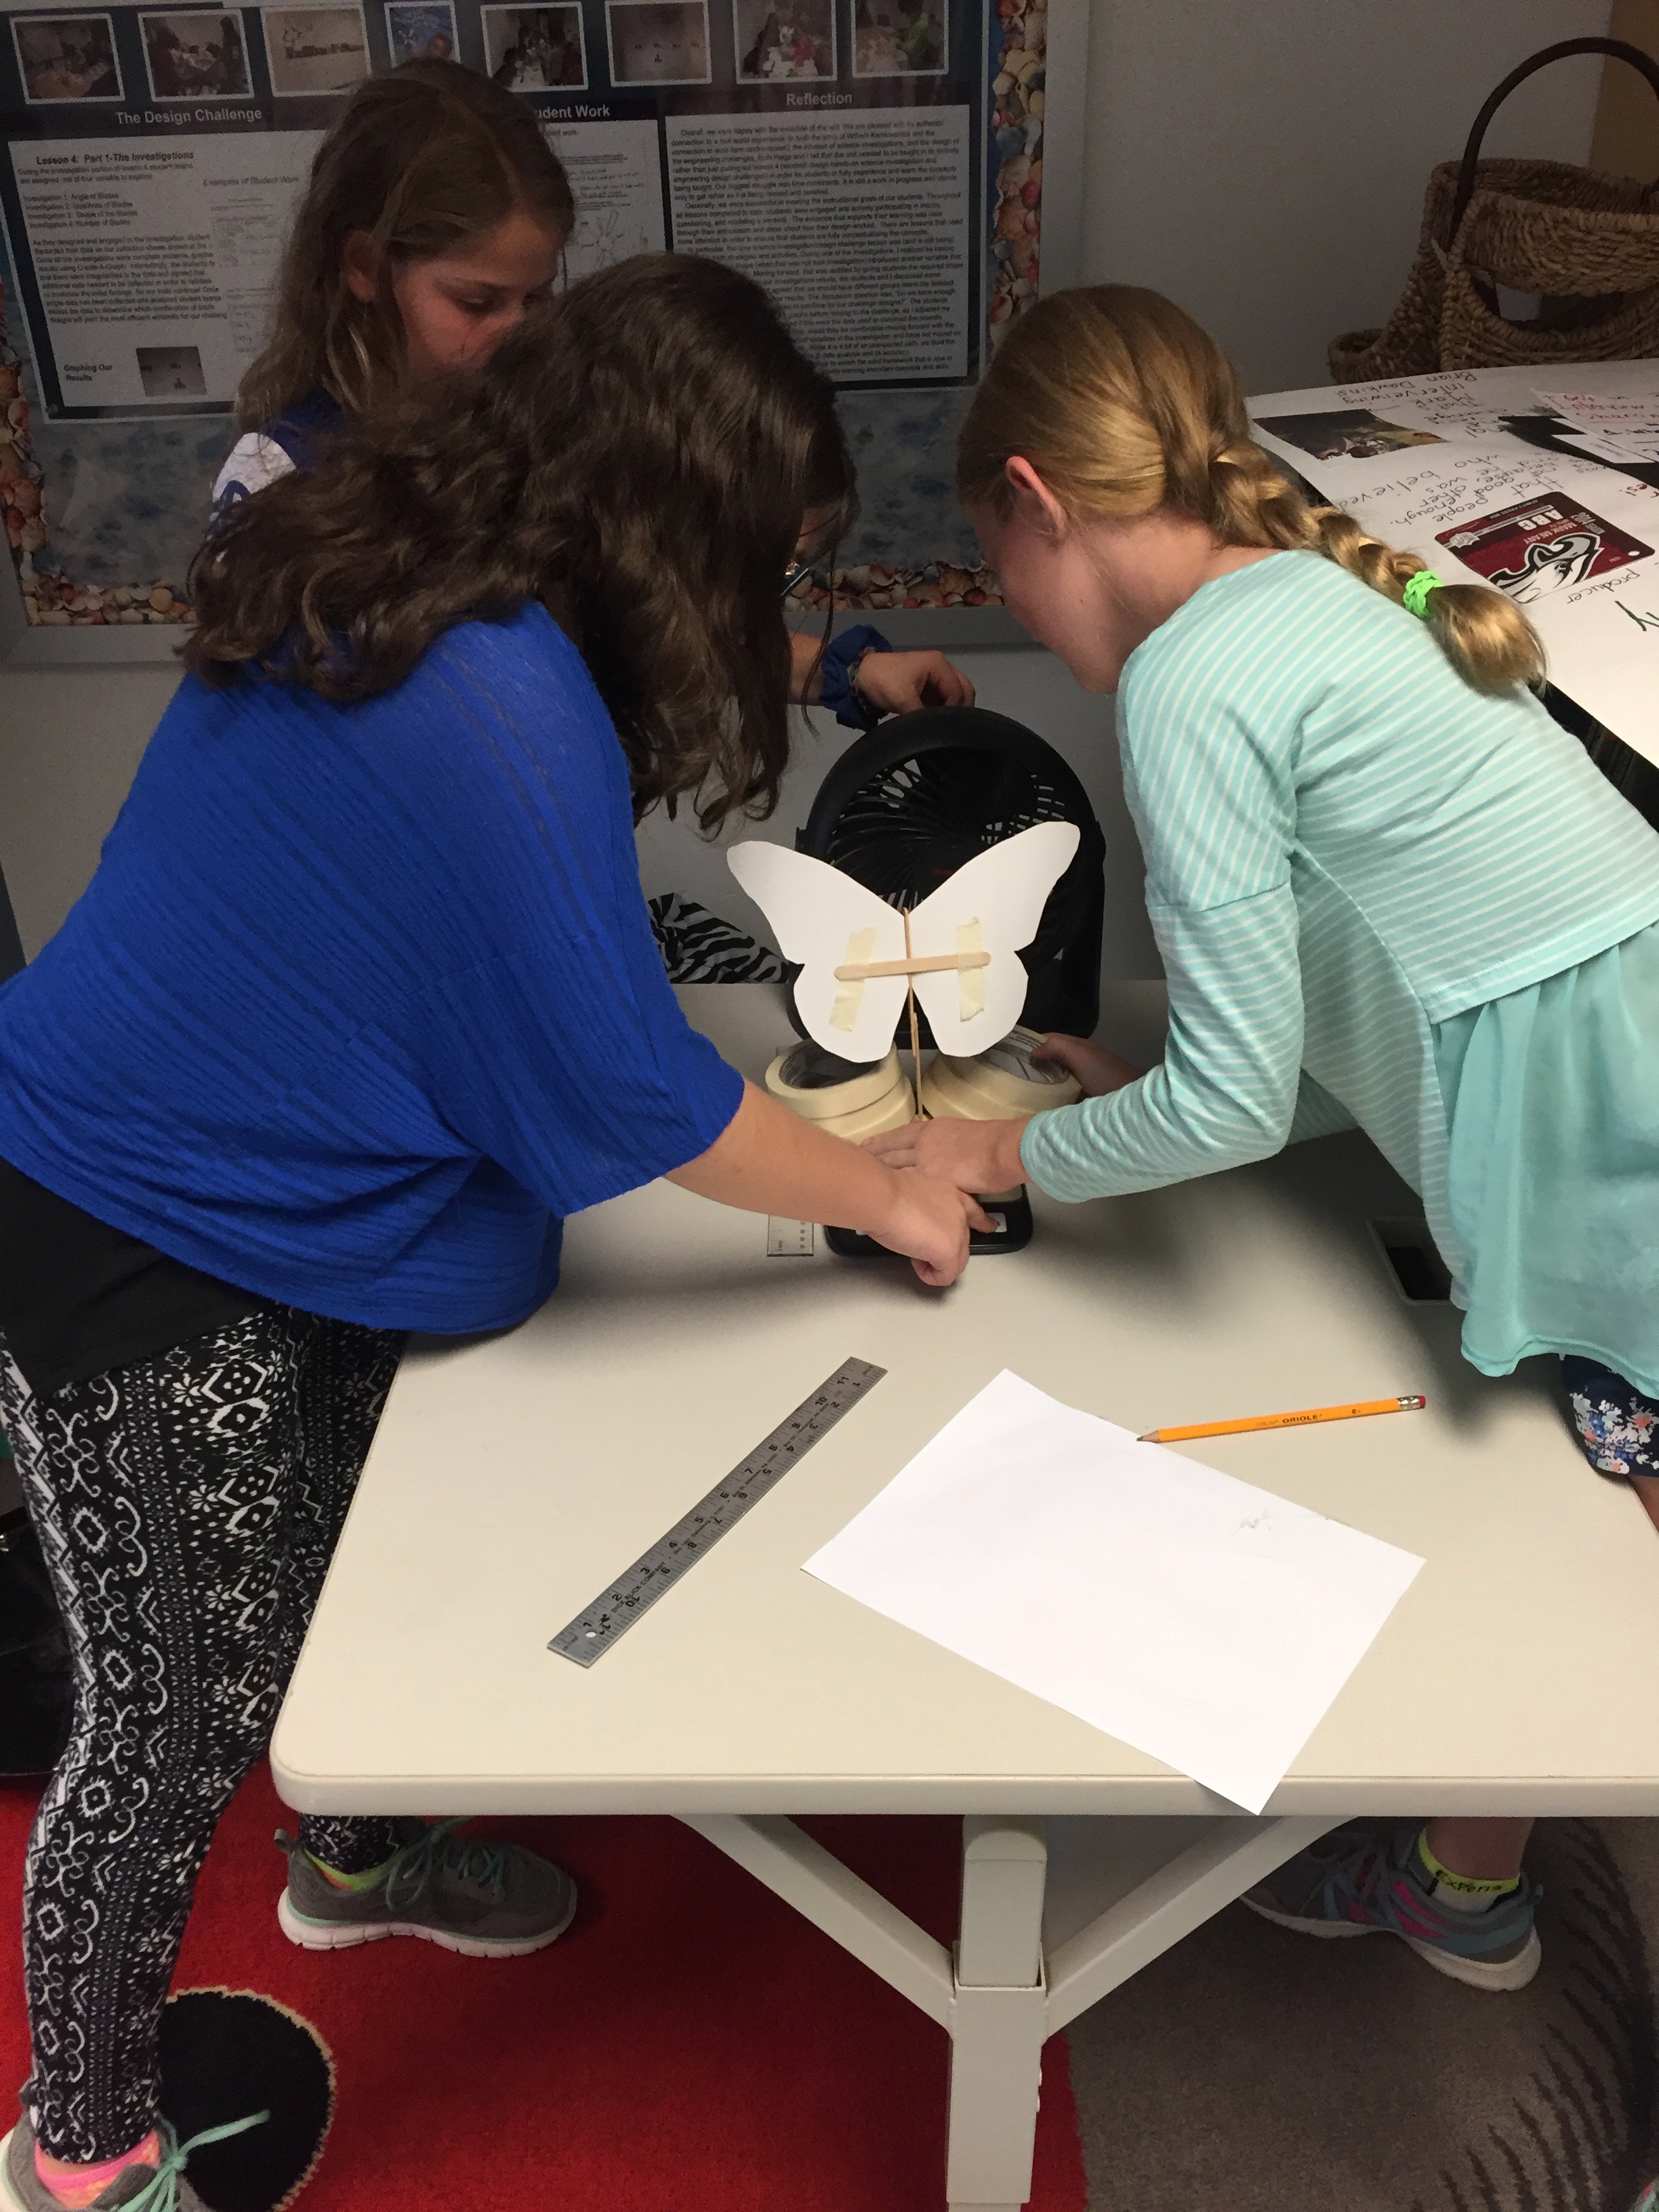
- Setting up the testing station. The tabletop fan should be set up at the end of a table (see safety precautions on p. 79). The digital scale should be set up 10 centimeters from the base of the fan. If the fan has a pivoting head, the angle of the airflow should be parallel with the tabletop. A piece of tape should be placed on the scale to indicate where the butterfly stand is to be placed. Make sure the scale is set to grams and the student or teacher who operates the fan understands where the highest setting can be found on the fan, and follow safety precautions listed in the article.
Getting Started: The Hook of the Lesson
Students were introduced to the forces acting on objects in flight through a web-based flight simulation (see Internet Resources). They constructed virtual airplanes to either fly higher or longer depending upon the variables changed on their planes. Through the investigation of different design components, students learned how weight, thrust, drag, and lift all affect flight. Be sure to remind students of your internet rules and monitor that students are only accessing the simulation website during this portion of the lesson.
To integrate reading and concepts of forces and flight with our butterfly wing design lessons, students read the article Unraveling Butterfly’s Aerial Antics Could Help Builders of Bug-Size Robots, which provided a real-world example of how engineers and scientists use nature in designing robots that glide (see Internet Resources).
EDP Stages: Ask and Imagine
To engage students in the “Ask and Imagine” phases of the EDP, we presented the problem to our students: How does changing the angle of the butterfly wing, relative to the wind, change the lift force of the wing? As a class, students realized that in addition to changing the angle of the butterfly wing, they could also investigate other variables such as type or species of butterfly, size or scale, and materials. Students pondered, “What if the butterfly wings are bigger? Will it fly more?” “Do different butterfly species get more or less lift?” and “I wonder if all butterflies weigh the same—how does that change stuff?”
Prior Knowledge and Other Considerations
Overall, students understood that gravity is a downward pulling force but had difficulty understanding upward lift as a force that can be measured. We entered into a discussion of vertical and horizontal lift. One student responded, “Lifting a dumbbell up or down—that’s vertical lift” or “lowering a bag, right?” We used examples that connected to students’ everyday experiences, such as kicking a ball, to exemplify force at an angle. In order to help students think about measuring upward lift using scales, we asked students to imagine what would happen when stepping onto a weight scale that was at a zero reading. Students responses included, “When I step on a scale, the numbers go up,” and “The number is usually higher when my parents are on the scale.” When asked whether the reading was in positive or negative numbers, the students all responded that it read positive numbers. We then proceeded by asking “What would happen if on the same zero scale the weight was lifted upward—what would the reading look like? “It would be less than before.” We asked further what would happen to the scale reading if the object continues to fly? We drew a number line on the board, turning it vertically to help students understand the idea of lift being negative numbers. “Negative! Negative numbers!” one student replied.
These examples helped students understand how scales measure upward lift force. Since this group of fifth-grade students demonstrated strong math skills, we introduced an additional math component: converting grams (mass unit) to Newtons (force unit). Although this was a new concept for the students, they all knew of Newton and his apple and understood the simple algorithm for converting (divide mass in grams by 100, using 10 m/s2 as acceleration due to gravity) when we engaged them in a discussion and practice exercises of the math calculation. In particular, we provided examples on the board for students to convert grams to Newtons with guided and independent practice. While this is an authentic means of measurement for lift, not all intermediate students will be ready for this concept. When teaching this unit to students who may not have advanced math skills and concepts, it can be scaffolded by keeping the measurements in grams while still explaining that lift, in science, would be measured in Newtons. Another concept requiring extra discussion was that the data collected was represented as negative measurements.
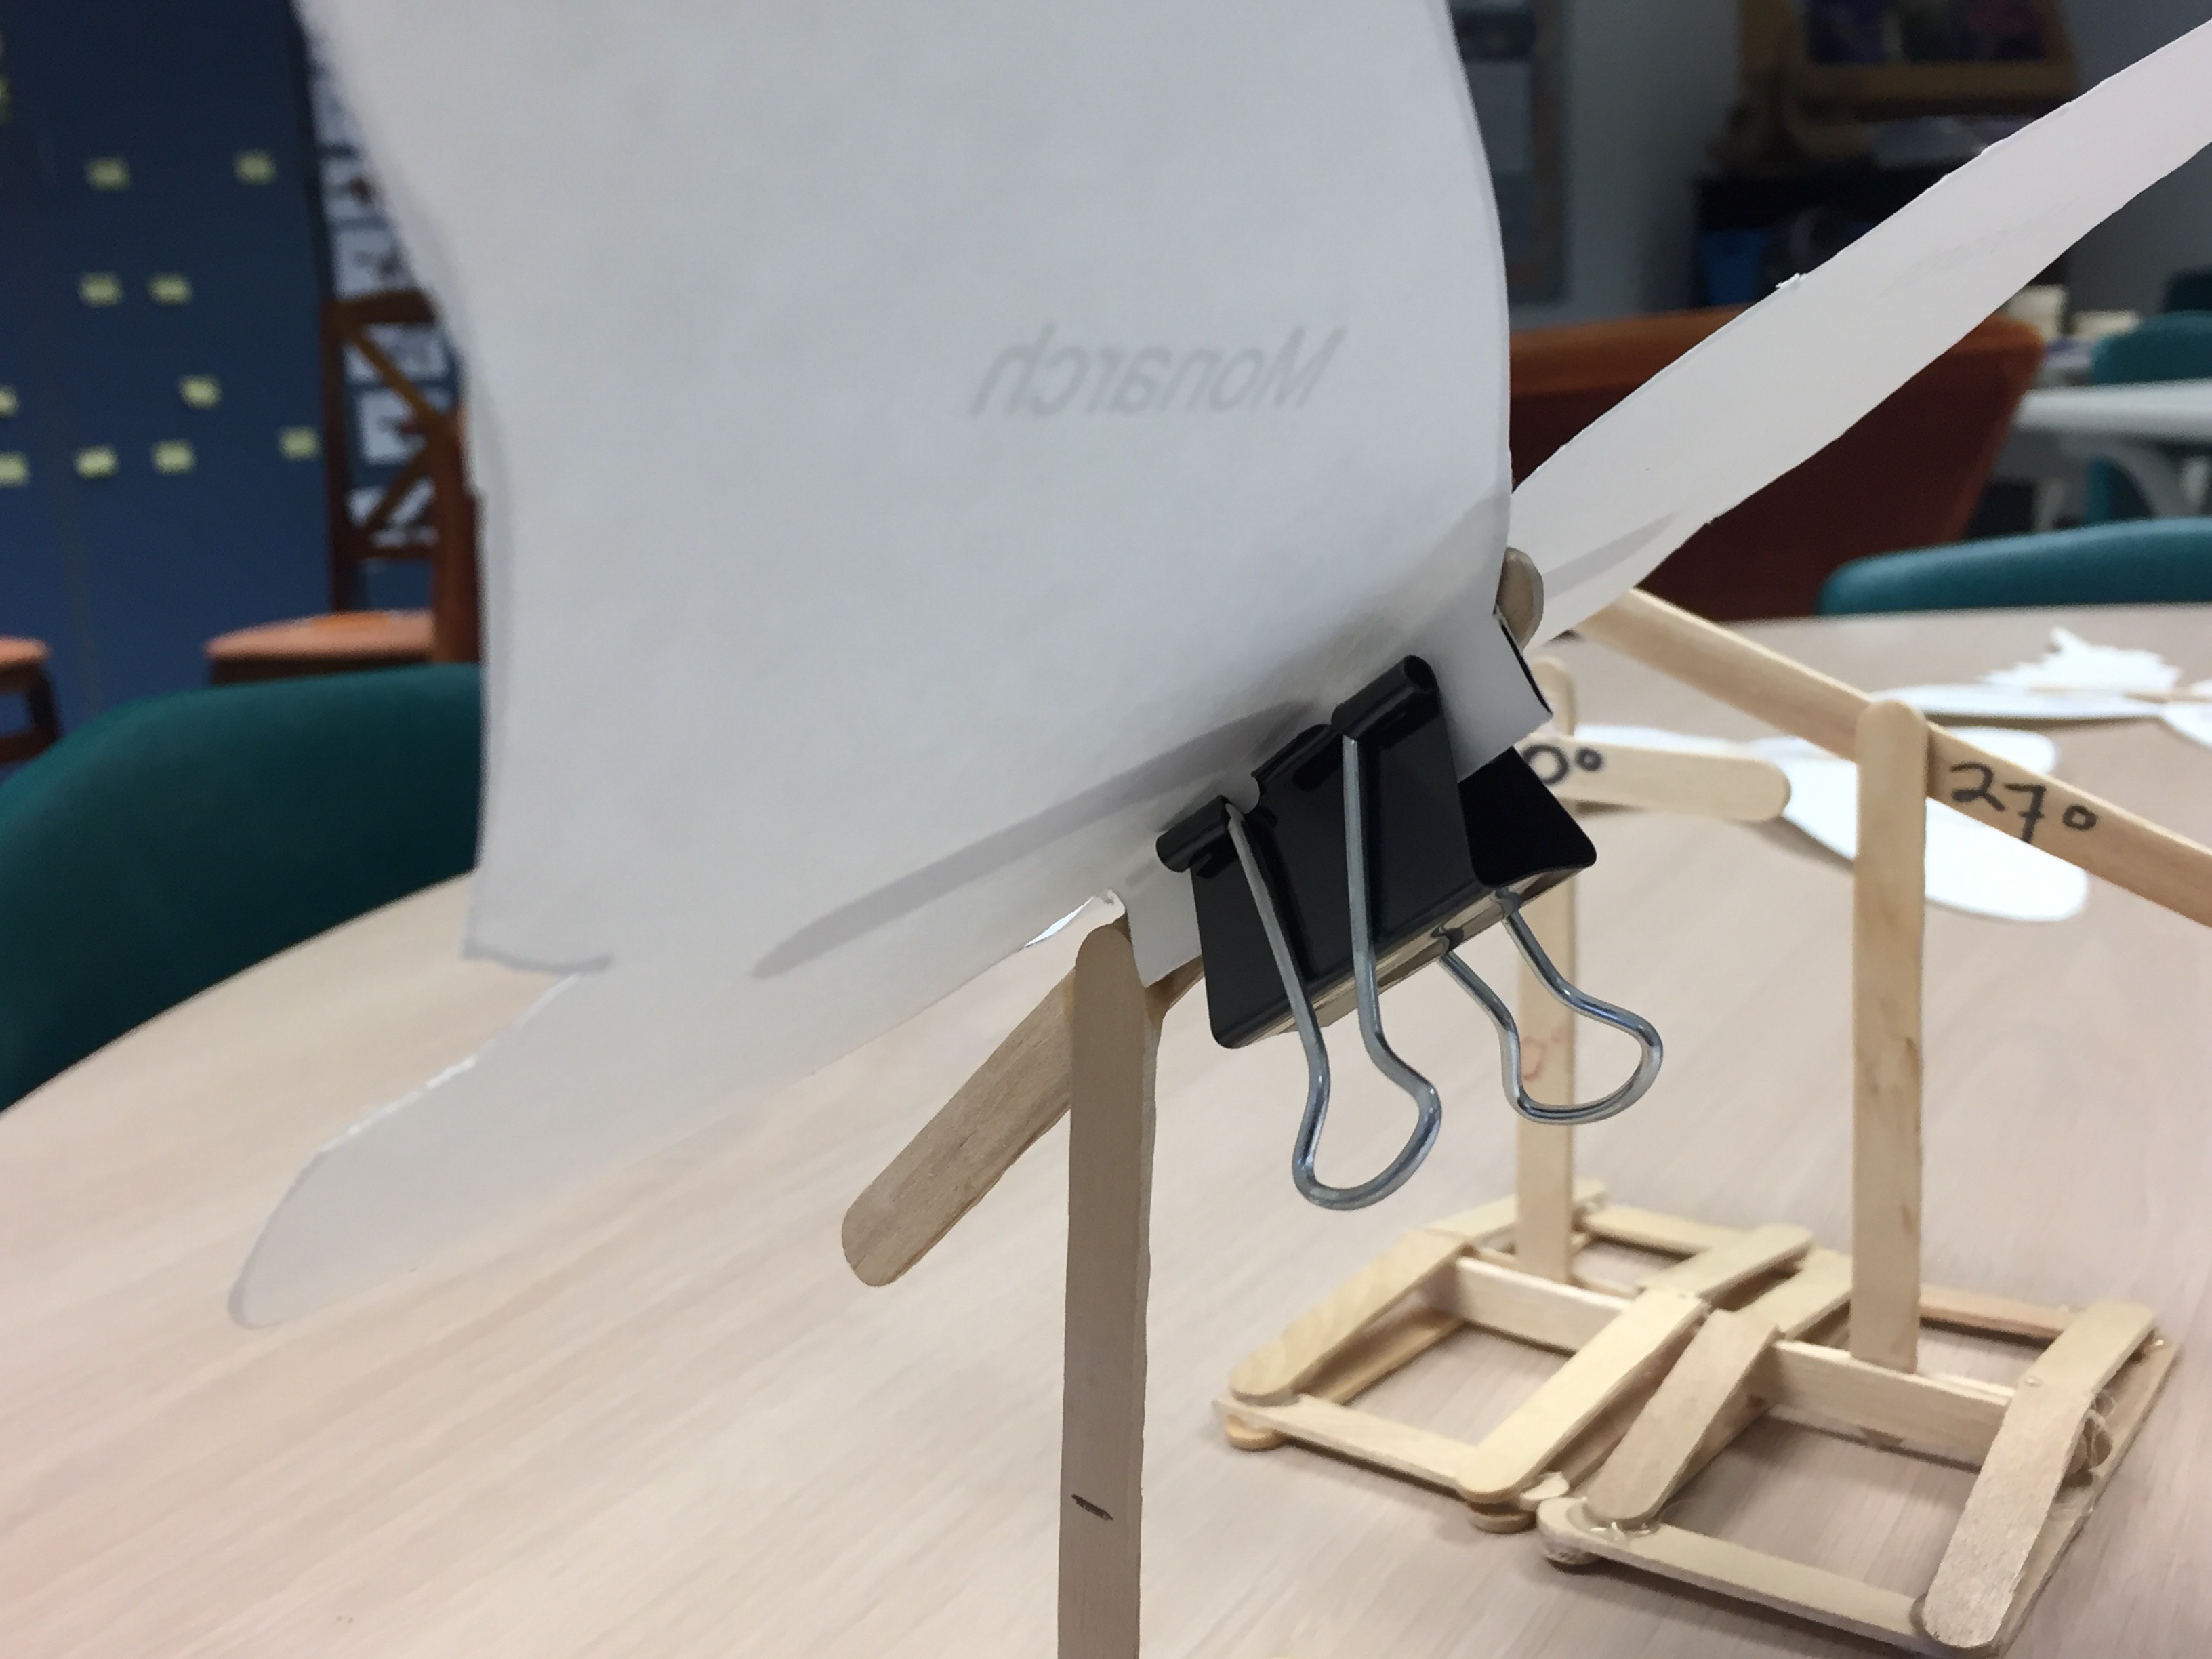
Students set the scales to grams and to zero using the tare function. When asked why it is important to do this, students responded, “We don’t want to know the weight of the butterfly and stand—just how much the air is lifting it—right?” We showed students how to use the tare function and how to read the scale measure. To scaffold this activity, you can provide an example to students by clipping a simple paper airplane (or a butterfly template) to one of the angle stands (see Figure 1), place it on the scale, using the tare function to set the weight to zero, and turning on a fan angled at the airplane. Students should see the numbers on the digital scale as negative numbers representing lift. We allowed students to practice the use of the tare function, using the scale to measure the lift, writing their data on their sheet, and converting their data from grams to Newtons. Finally, we discussed how to read the lift force when the scale was fluctuating between values by selecting a midpoint value or getting an average of their reading.
EDP Stages: Plan, Create, and Test
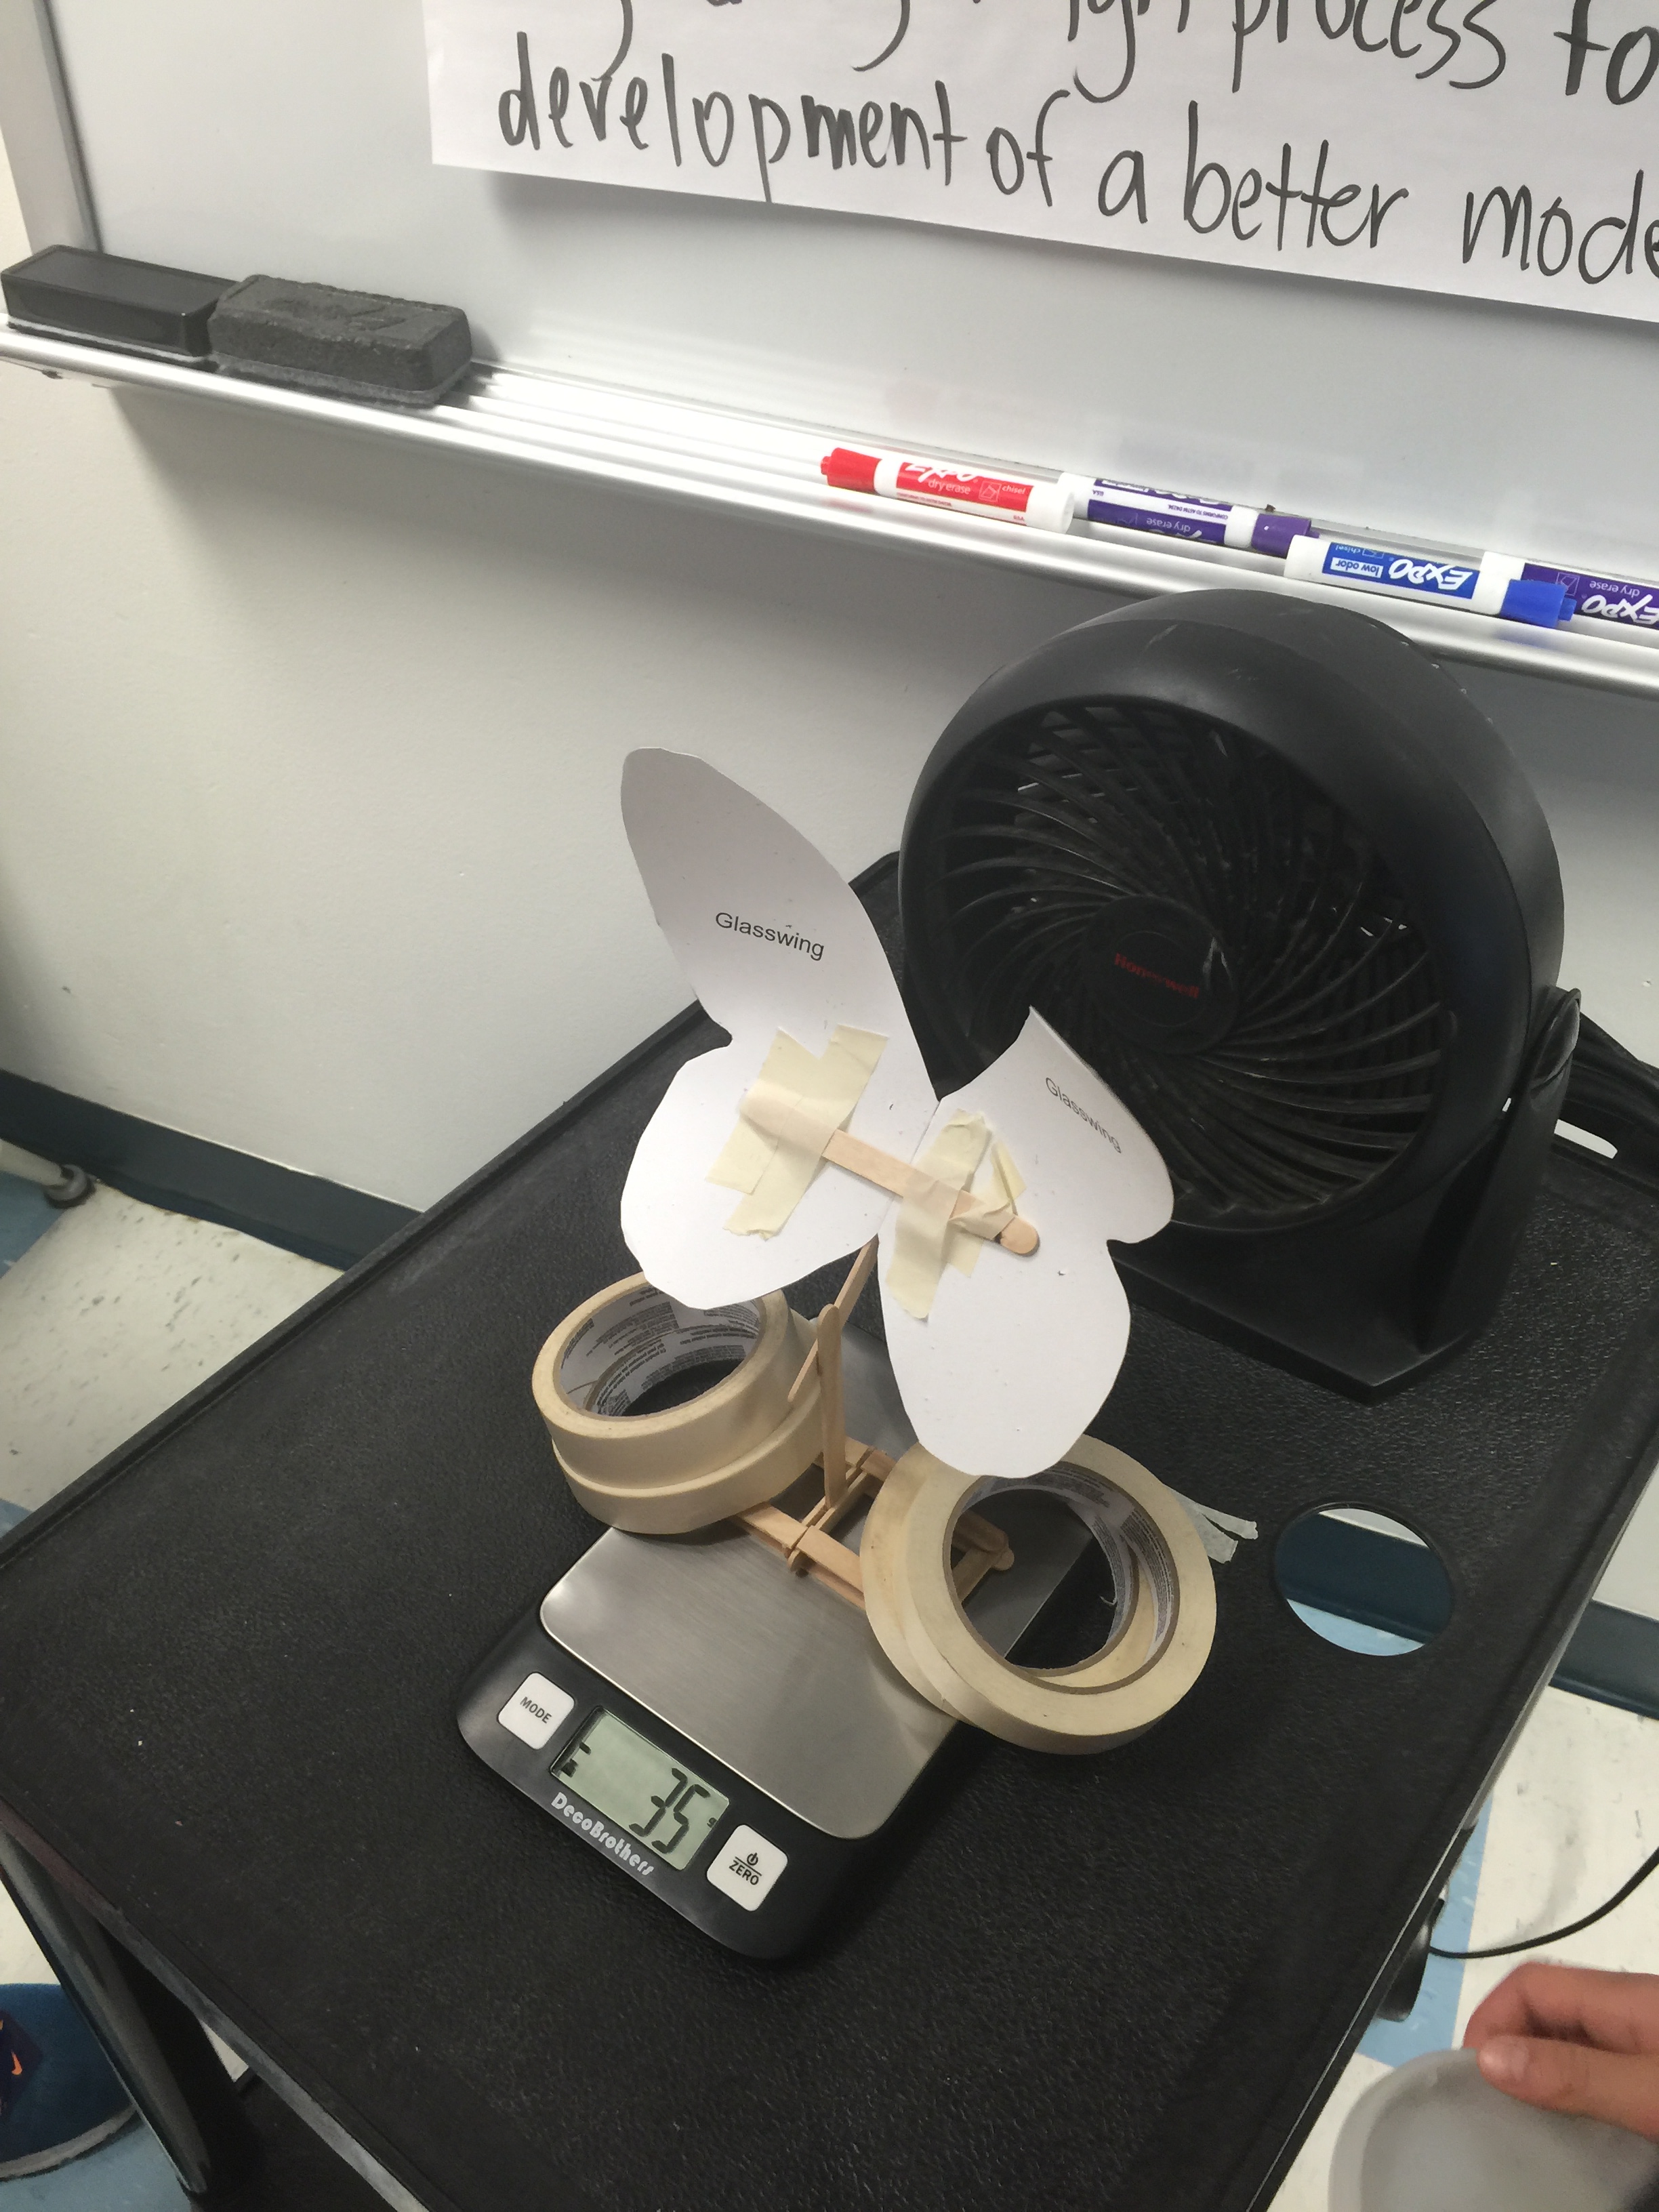
The heart of this investigation lies in measuring and comparing the factors impacting lift forces on model butterflies. Butterfly models, cut from various materials, were clipped to angled stands, built from craft sticks, and subjected to oncoming wind from a fan. Supplies for the investigations were distributed to groups of two to four students, including data sheets and chart paper for whole-group reporting. Each group was assigned one of the four variables to test and report back to the whole group. The variable investigated by the first group of students was materials, which included cardstock, paper, and foil using the monarch as the standard species and a 45-degree angle stand. The second group of students investigated the scale models of butterfly wings. This investigation included a monarch standard template that represented 100% of its original size, a reduced size monarch (67%), and an enlarged monarch (155%). Templates were reproduced at various sizes using a photocopy machine. A 45-degree angle stand was used for each size. The third group investigated the lift potential of four different species (monarch, glasswing, orange aeroplane, and four bar swordtail), using the standard template size and a 45-degree angle stand. The final group investigated wing angles against wind forces by using a standard monarch template clipped to angle stands at varying degrees of angles with regard to the incoming wind (0°, 27°, 45°, 72°, 90°; Figure 2, p. 80). All supplies were prepared in advance and presorted into investigation bins prior to the lesson. Three trials were required to test each variable, using a testing station that had been set up in advance. Each wing was clipped to its angle stand that was prepared in advance for each group using a binder clip, placed on a zeroed scale, weighed down, and subjected to the airspeed of the fan on the highest setting (Figure 2).
We recommend having one student instructed on the use of the fan and in charge of its operation. Students should stand back from the fan. Place the electric cord where it will not present a tripping hazard for students. Additionally, students with long hair should tie it back to avoid accidental entanglement in the fan. It is important to note for students that the angle of the butterfly stand needs to face the airflow of the fan and that the stands are weighed down sufficiently so they do not lift off the scale, altering the true angle being tested. Each group collected and recorded data for each trial. The “ah ha!” moments came when students noticed outliers in the data collected. Some groups needed teacher-prompting to evaluate if their results “made sense.” “We better check that again—that just doesn’t seem right,” came the response from one student. When one group seemed to be struggling to get consistent data, we had two groups retest the same variable and compare data. This was a very powerful teaching moment! Students began to think purposefully about their data, what it meant, and if their results were reasonable. They looked at possible reasons for the differences in data. “Is everything except the variable being tested constant?” we (the teachers) urged. “We should make sure the butterfly stand is the same distance from the fan each time,” “Maybe we should not stand near the butterfly when we are testing it because we might be changing the airflow with our bodies” were the surprising responses from our students. After making sure that all other variables remained constant, the data looked more reasonable. This was a teachable moment that wouldn’t have had the same impact had we simply told the students about the importance of accuracy in testing. When we asked students what they discovered about trials in their investigation, one student replied, “Well, the constants really have to be constants—I mean carefully checked so we get accurate results and if our trial looks unreasonable, we’ve got to check it again.” The students developed the following guidelines for the engineering design challenge: (a) the fan and scale must remain consistently 10 cm apart, (b) there must be a mark on the scale where the angle stand is consistently placed, (c) the angle stand must not be allowed to lift off the scale or it changes the angle, (d) the fan must be at the same speed, be allowed to get up to speed before taking data, and remain at a consistent angle to the scale, (e) nothing should impede or change the airflow, and (f) if the data seems unreasonable—retest.
The group responsible for testing the scale variable struggled to determine the area of their model wings. Producing a scaled butterfly by using graph paper proved to be an extremely difficult task. This part of the exercise was adapted using a copy machine to reproduce the larger and smaller sizes (67% and 155% of the original). At the end of this lesson, groups created bar graphs of the data collected in the four investigations (scale, species, angles, and materials) on chart paper. The results were shared with the class, and students analyzed the results of the collective data in order to have an evidencebased discussion in planning their design for the upcoming design challenge—improving butterfly lift.
EDP Stage: Improve
This unit offered many wonderful and surprising learning opportunities for our students. While the final challenge didn’t quite end the way we had predicted, the engagement, “ah ha!” moments, and authentic learning that the children created through failing forward was worth the time invested. There were certainly numerous opportunities for summative assessment. For us, the evidence of learning was not in the perfect butterfly model but in the students’ authentic engagement and clear understanding of working through the design process, truly understanding evaluating data, and owning the testing and data. As with many project-based units, there is upfront preparation. Once complete, many of the components are reusable, making future applications far more user-friendly. The teacher in this unit truly becomes the guide on the side, which allows the opportunity to facilitate higher-level thinking in our students. ■
Internet Resources
Butterfly Wings May Improve Airplane Wings
http://www.insidescience.org/video/physicsbutterfly-flight
Science Buddies Templates
http://www.sciencebuddies.org/ Files/5120/5/butterfly-outlines.pdf
Smithsonian National Air and Space Museum’s How Things Fly
http://howthingsfly.si.edu
The Physics of Butterfly Flight
http://www.insidescience.org/video/physicsbutterfly-flight
Unraveling a Butterfly’s Aerial Antics Could Help Builders of Bug-Size Flying Robots
http://releases.jhu.edu/2012/02/01/ butterfly-study-could-help-builders-ofbug-size-flying-robots