![]()
![]()
Teacher's Toolkit
Atoms and matter
An engineering design challenge with an emphasis on the design process

Current research suggests that there is a need for science education that incorporates engineering practices (Hernandez et al. 2014; Guzey, Moore, and Harwell 2016; Guzey et al. 2016). However, I have found that although my students enjoy completing design challenges, they are not able to articulate how the engineering challenge relates to the science content they are studying. This content connection piece is crucial for the successful integration of engineering in science classrooms. As a result, I have created a tool that I call the “Design Thinking Document” to assist teachers in integrating engineering into their science teaching practice with fidelity. This document requires students to track their thinking about the design process while connecting the design to both the content and their worldviews (by activating their background knowledge).
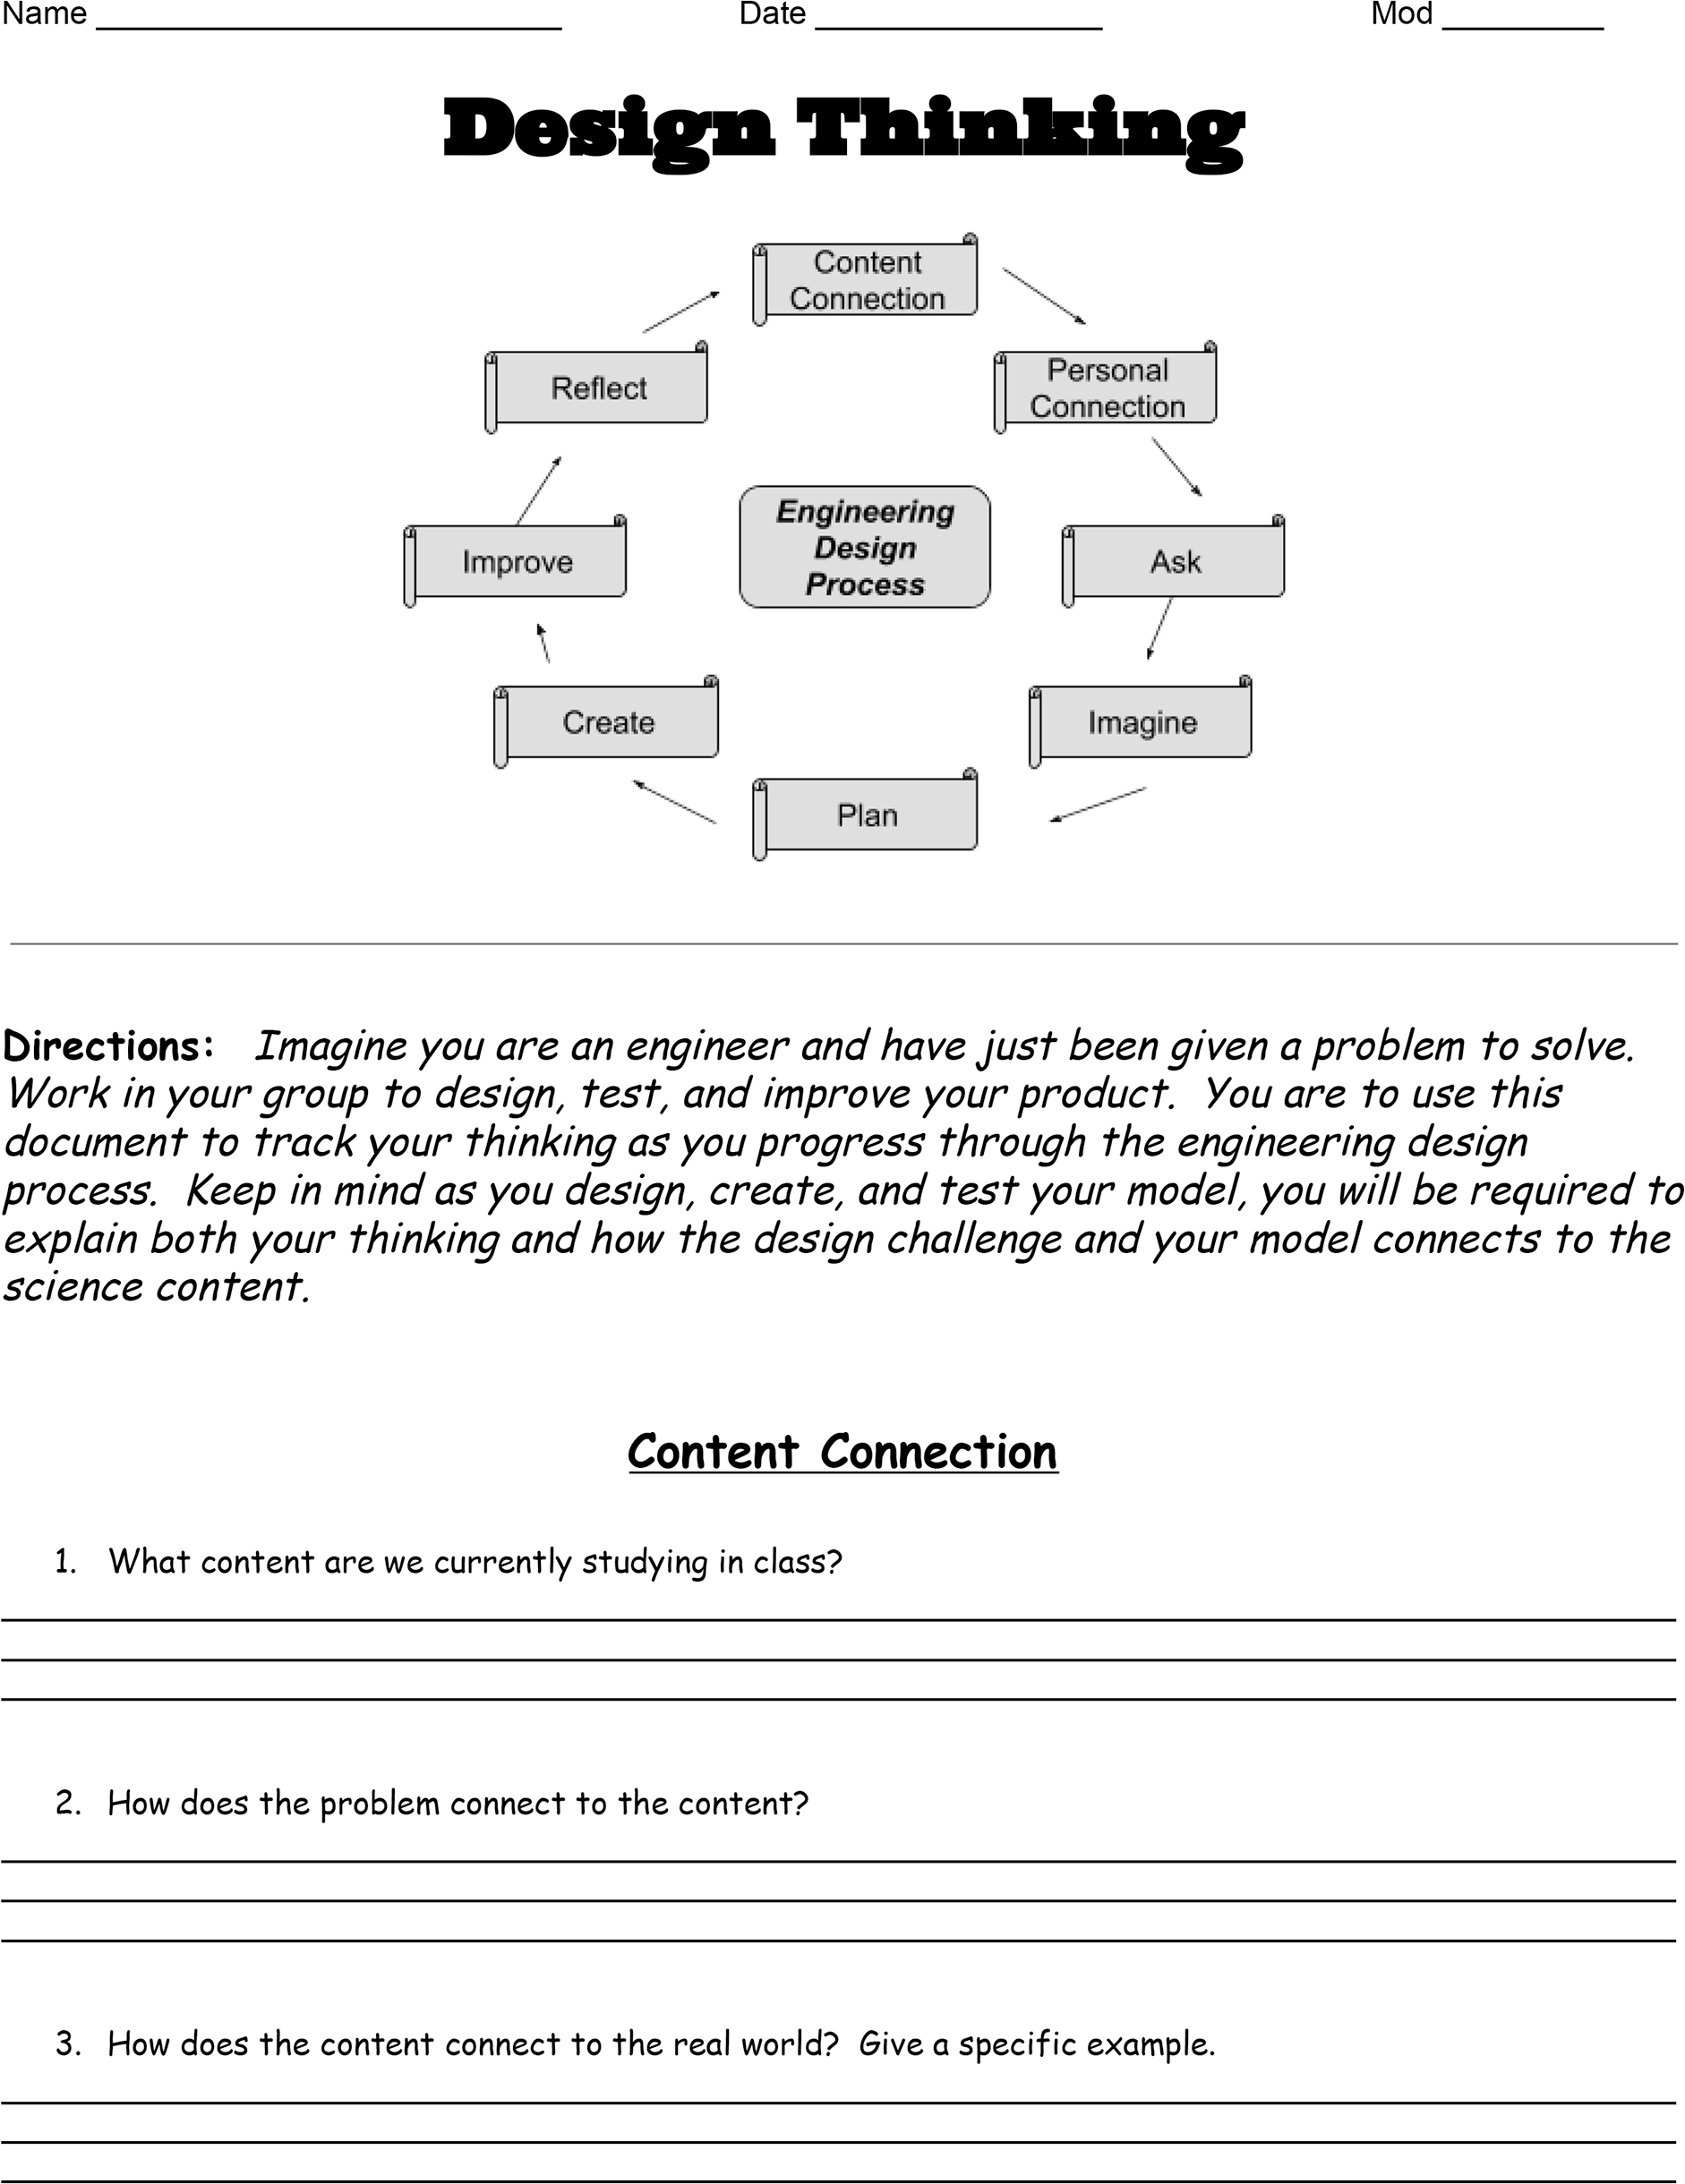
The Design Thinking Document takes students through the different aspects of the design process. The document involves students in making connections between content and the design challenge; unlocking the design challenge prompt; imagining, planning, and creating their design; and reflecting on improvements (Figure 1).
I used the Design Thinking Document in an introductory unit about matter. This lesson was used in co-taught classes, general education classes, and honors classes. Students worked in heterogeneous groups (high-, middle-, and low-performing students) to complete the engineering task; groups consisted of three to four students. Students were given accommodations aligned to their various IEPs that included sentence starters, extended time, and reduced distraction (students worked in a classroom used for pull-outs). These students worked in the alternate location for the construction and testing of their model.
During the engineering design challenge, there are several safety considerations to address. First, when students take part in an engineering design challenge, they tend to get very engaged and excited. This can be chaotic if this is their first time participating in such an activity. Teachers should set the stage with clear expectations and rules. Students should be reminded to stay in the groups they are assigned to and keep their voices down. Furthermore, students can become frustrated by the fact that there is no expected outcome in an engineering design challenge. The first time I conducted a design challenge with my classes, I was inundated with concerns from my students about their design not working and not knowing what they should do. Students should be reminded that there is no correct answer, and if they adhere to the constraints of the challenge, they will be successful (even if their design does not work).
Introducing the lesson
To introduce this lesson, I asked students to create a T-chart in their interactive notebooks (composition book that is used for notes, foldables, laboratories, etc.). In the right column, I asked students to make a list of items they are familiar with that take up any amount of space and have a mass. In the left column, I asked students to make a list of things that do not take up space and have no mass. Differentiation strategies included giving students the option of either drawing a T-chart in their journal or using the printed version. Students were afforded the opportunity to turn and talk to their neighbor for assistance with brainstorm examples. Students were given five minutes to create their list and were able to easily identify everyday objects that have mass and take up space. However, many students struggled to think of examples of things that do not have mass or take up space. Examples of student responses for things that take up space and have mass included desk, chair, dog, me, book, Fortnite game, and basketball. Student responses for things that do not take up space or have a mass included air, fire, and space. As evidenced from the list, many students had misconceptions about nonmatter and struggled to identify examples.
Next, students discussed their list with their group (groups ranged from three to five students). While discussing, students were instructed to analyze each other’s list and to ask clarifying questions for anything on the list that they did not agree with. The group was instructed to come up with one final list and record it on chart paper. While students were discussing and questioning, the teacher walked around the room and asked probing questions such as: 1.Can you think of anything in your daily life that you cannot hold or touch? 2.What are some things we need or use every day, but we cannot see or touch?
Students were given 10 minutes to complete this task. Once all lists were completed, the chart paper was posted around the classroom for future reference. As we progressed through the unit, the incorrect answers that were listed were crossed out and placed on the correct chart paper (i.e., matter or nonmatter).
Introduction to matter
As an introduction to matter, students referred to the list they created in their interactive notebook. Students labeled the right column “Examples of Matter” and the left column “Examples of Nonmatter.” A class discussion was held to identity the misconceptions around matter and nonmatter, with the chart paper from each group as a guide. A common misconception was the identification of air as nonmatter. I asked students to think about birthday balloons and how they float in the air. Students were able to identify helium as being the reason that balloons are able to float in the air. I then pointed out helium on the periodic table to students. With this example in mind, students gained a clearer understanding of matter and were able to cross several items off their list that were misplaced, including air and fire, and record them under the appropriate heading. Seeing the periodic table helped students make the connection to matter because they realized that even though they cannot see something (such as helium), it can still have mass and take up space. Students were able to see the atomic mass on the periodic table for the various elements; they realized that helium must take up space because the balloon gets bigger when filled up with helium. To reinforce this concept, students investigate the mass of an empty balloon and a balloon filled with helium in future lessons. This helps students to grasp the idea of air or gases having mass.
Students were then introduced to the term “atom” as they watched a BrainPOP video entitled Atoms; the link to the video is available in the Online Supplemental Resources. The video describes the composition of matter: atoms. At the conclusion of the video, students answered the questions from the BrainPOP video in their interactive notebook. Questions from the video address the composition of atoms and relate atoms to matter. The BrainPOP video explained the structure of an atom and introduced students to vocabulary words such as molecules, protons, neutrons, electrons, atom, element, nucleus, and so on. Differentiation strategies included a printout of the BrainPOP questions; advanced students were asked to write three additional questions of their own and exchange with a partner to answer.
Design thinking: Making content and personal connections
Students were introduced to the Design Thinking Document and given the following challenge: Create a structure using gumdrops and toothpicks that stands at least 3 cm off the table and will hold the mass of a science textbook. This task requires students to use the engineering design process to develop a model that is representative of how smaller things can be arranged and then rearranged to form larger structures that serve a purpose that differs from that of its individual components; synonymous to how atoms join together to create molecules (matter). Atoms are too small for students to see, thus, the design challenge allowed students to build a model that was analogous to the construction of matter. After completing the task, students should be able to make the connection between atoms and matter (atoms being arranged to form matter). After being introduced to the challenge, students were instructed to think about how the design challenge is connected to both the real world and the content (atoms and matter). Using the Design Thinking Document, students answer the following questions under the “Content Connection” section:
- What content are we currently studying in class?
- How does the problem connect to the content?
- How does the content connect to the real world?
Students were able to correctly identify “atoms” and “matter” as being the content we were currently learning in class. Common content connections that students listed included: everything is made up of atoms, toothpicks and gumdrops are both matter, and atoms are the building blocks of matter. With the explanation that matter is anything that has mass and takes up space, students were able to provide examples of matter they use every day. Connections that students made to the real world included cell phones, gaming systems, and themselves.
To demonstrate a personal connection that students can make to the content, students had to draw a picture or write a description of how they connect to the concept of matter on the Design Thinking Document. Before making this connection, students were reminded of the focus of the design challenge, which was to explore how smaller things (atoms) can be combined to create larger things (i.e., molecules or compounds). To make a personal connection, I provided examples verbally, which many students drew; examples included a picture of a human, a basketball, shoes, books, and a phone. Students understood that their diagram should be an example of matter.
Design thinking: Ask
When the connection between the content and the design challenge was established and students related this to both a real-world example and a personal connection, they moved on to the “Ask” portion of the design process. During this phase, students used literacy strategies, such as circling the action verbs in the prompt and underlining key points, also referred to as “unlocking the prompt.” (The prompt: Create a structure using gumdrops and toothpicks that stands at least 3 cm off the table and will hold the mass of a science textbook.) Unlocking the prompt required students to write the prompt in their own words and identify the constraints that they must adhere to. For this design challenge, students were given the following constraints: You may only use the materials provided, and the final product must stand at least 3 cm off the table. The materials students were allotted included 20 toothpicks and 10 gumdrops. Students had to think about how they wanted to use the materials that were provided. Students were instructed to use a ruler to ensure their structure was at least 3 cm off the table.
This is also where students were able to conduct research and record their findings using various sources of their choice to obtain information that would assist them in their design. Students used Chromebooks or their cell phones to conduct research. Students were provided with some guidance as to what they should research. This included providing students with the following items as a starting place for their research: stable structures, geometric shapes, and bridge designs. This list of terms was posted in Google Classroom for all students to view and visit as needed. Students recorded their research on the Design Thinking Document, under the “Ask” section. Students discussed their research when they worked with their groups to discuss and design the best solution. As groups were discussing, I circulated the room and assisted those groups that were not engaged in discussion.
Design thinking: Imagine, plan, and create
Students used the research and worked in their groups to brainstorm possible solutions and the pros/cons that aligned to each. This information was filled into the table in the “Imagine” section of their Design Thinking Document. Students were instructed to work with their group to come up with at least three possible solutions with the corresponding pros/cons; the document provided space for four. One such possible solution that students in my class came up with was to cut the gumdrops in half. The advantage of this is that they would have double the number of gumdrops to work with; the disadvantage is that the smaller gumdrops may not be as effective in supporting the mass of the textbook.
With the possible solutions in mind, students moved on to the “Plan” phase of the design challenge. This is where students (in the same pairs from previous steps) drew and labeled a blueprint of the design they wanted to create. Students were also required to provide an explanation of the blueprint on the document and list all the materials they would be using. Before students were able to move onto the next phase of the design process, I required that they show me their labeled drawing (blueprint) and their description to ensure that all student pairs had a plan recorded on their paper before building. Feedback was not offered on the designs; rather, the designs were checked for completion (labels, structure drawn, materials listed, etc.). Because students were not offered feedback, they had the autonomy to design the structure as they saw it without being influenced by the teacher or the solution they thought was “correct.” It is important to let students know that there is no wrong answer in the designs they come up with, so long as the constraints are adhered to and they are working to develop their solution. Students explained the shape they were using to build their design (triangles, rectangles, squares, etc.) and why (more strength, to conserve materials, to mimic something they saw while doing research).
Using the blueprint, students gathered their materials and began to build their design. Before gathering their materials, safety precautions for the activity were discussed. This included wearing safety goggles to prevent a toothpick (or fragment) from hitting their eyes. Students were reminded that the toothpicks are sharp and should not go in their mouth or be used to poke their peers. Additionally, although it can be tempting to eat the gumdrops, remind students that it is not sanitary, and the gumdrops are being used as a laboratory material.
Students were given a sheet of construction paper on which to build their design to avoid leaving a sticky residue on desks. Additionally, to aide in classroom management, the materials should be counted ahead of time and organized into bags, cups, baskets, or something similar for students to take back to their seat. This eliminates the dropping of toothpicks and gumdrops all over the classroom floor as students race to gather their materials.
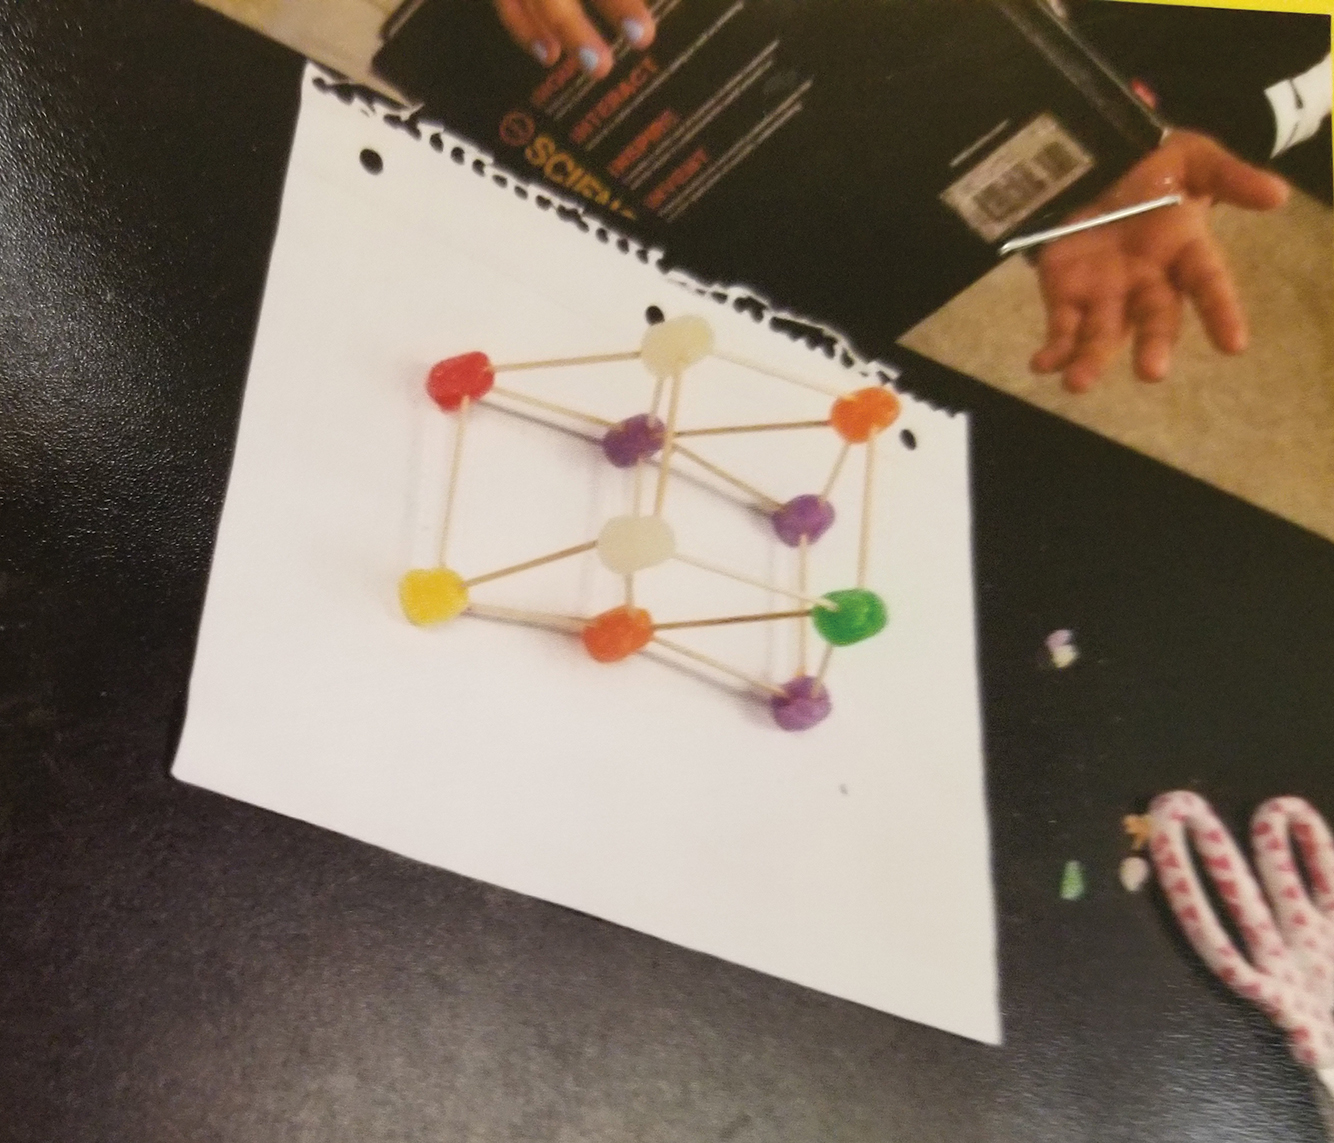
After building, students used the “Create” section of the document to draw a picture of the model they created; see Figure 2 for a sample student construct. Students were required to document their creation because their models tended to differ from their plan (blueprint) once they started building. Students realized that what they planned for may not work or they developed new ideas as they discussed and problem solved. Once built and drawn, students tested their design by placing the science textbook on top of the design. Student recorded the results of this test in the “Create” section and recorded which improvements needed to be made. The results recorded from all students indicated that their first test resulted in a collapsed or semi-collapsed structure.
Design thinking: Improve and reflect
With the results of the first test in mind, students entered the “Improve” phase of the design process. Students began by reviewing their Design Thinking Document from the previous two days. In the table provided in the Design Thinking Document, students recorded all improvements/changes they made to their design, the results after making the improvement/change, and what still needed to be changed. Once the final modification was made, students sketched their final creation, tested their final design, recorded their results, and explained if their creation successfully met the challenge. This was documented in the “Final Results” section of the Design Thinking Document. Then students answered four questions in the “Reflection” section of the Design Thinking Document:
- If you had the opportunity to repeat this challenge, what would you do differently and why?
- Identify how your thinking has changed as a result from the beginning of this activity to now.
- Describe any issues you faced while completing this design challenge; how will you account for them during your next design challenge? If you did not have any issues, why do you think that is?
- How can you use what you learned during this design challenge in the future?
Evident from student responses was the definition of matter (something that has mass and takes up space) and that atoms make up matter. Some students were unable to make the connection between atoms and matter at this point in the lesson. To assist students who had not made the connection, we engaged in a whole-class discussion about the parts of our model and what they represented. By the conclusion of the discussion, the following analogy was written on chart paper and posted:
Atoms = Gumdrops
Toothpicks = Chemical bonds
Structure = Matter (e.g., elements, desk, phone)
I left this chart paper up for the remainder of the unit.
Evaluate
After students completed the challenge, they answered the following questions as an evaluation:
- Explain the structure, properties, and interactions of matter.
- Explain the basic structure of matter. (Hint: Think about the engineering design challenge from the previous day.)
Students answered these questions on a loose leaf sheet of paper and then placed them in our classroom self-evaluation station. This station consists of three folders: (1) Red: Indicates that students do not understand and need more instruction; (2) Green: Indicates that students kind of understand, but could use a little more assistance; and (3) Blue: Indicates that students understand and are ready to move on. This information is used to plan future lessons and activities and to elaborate on the content covered in this lesson. This is a means of both formative assessment and self-assessment made by the student. Most students put their work in the green folder, which demonstrated that they understood the lesson but wanted more instruction. Because this lesson served as an introduction to the content, we referred to this lesson throughout the unit. Being able to revisit the design challenge throughout the unit assisted students in making the connection between atoms (gumdrops) and matter (resulting structure); that is, students began to see atoms as the building block of matter. Additionally, as students’ understanding began to change, we revisited the matter versus nonmatter charts to make corrections to their initial thinking.
Reflection
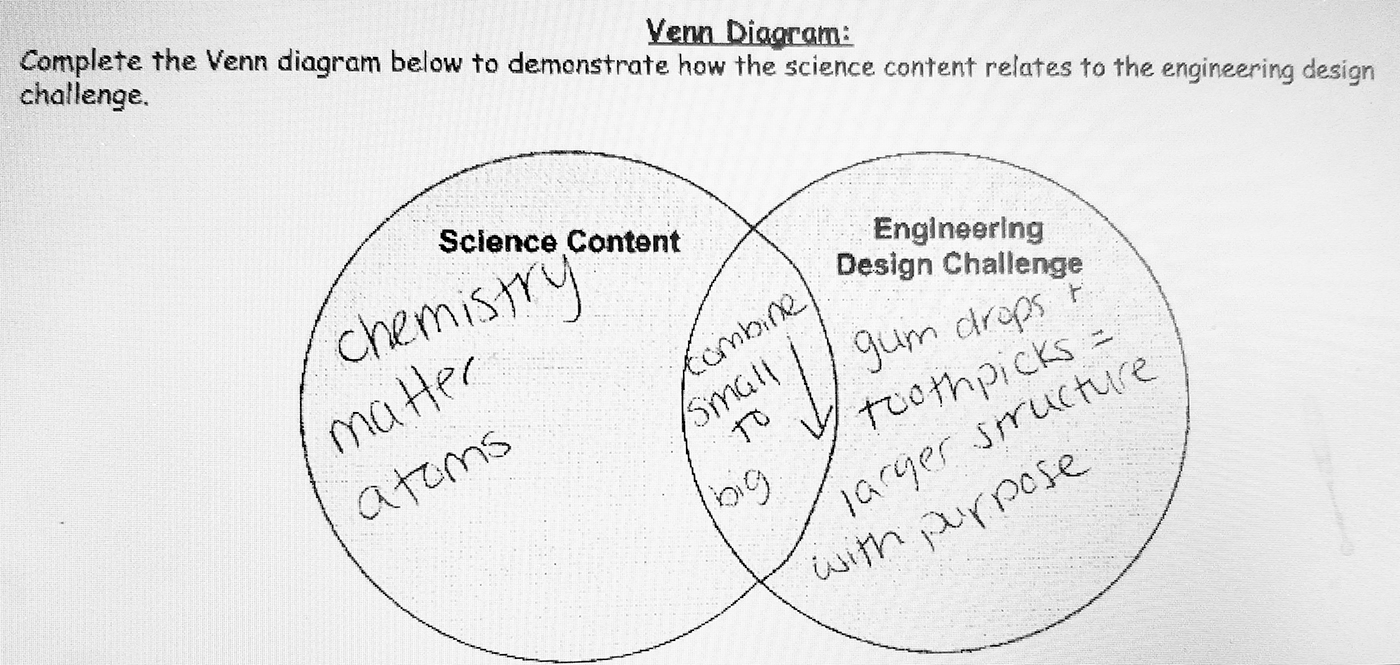
On completion of this lesson, I realized several things. Students were engaged in the engineering design challenge and were able to successfully complete the Design Thinking Document, but there was a loss in the content connection. This was evident by the lack of detail that students provided in their responses (on the Design Thinking Document) and the lack of explanation they provided. This was also evident by the one-sentence answers that did not cite evidence or express reasoning. Therefore, I modified the document to include a section where students would revisit the Content Connection at the end of the design challenge. This portion of the engineering design document requires students to use evidence gathered during the design challenge as well as content knowledge to create both a Venn diagram (see Figure 3) and complete a Claim, Evidence, and Reasoning (CER) writing piece. Following the lesson described here, I gave students the Venn diagram and CER and had them complete it using the information from the design challenge described in this lesson. The Venn diagram is used to demonstrate how the science content relates to the engineering design challenge. Using the Venn diagram, most students identified the content by topic (chemistry, atoms, matter, and/or nonmatter). Some of my more advanced students listed subatomic particles as well. For the design challenge side, most students either listed the materials they used in the challenge or the constraints and verbiage of the challenge as described above. In the center of the Venn diagram, students’ answers varied widely. Answers included things such as “building blocks,” “small to big,” “structure,” etc.
Students then used the Venn diagram and their Design Thinking Document to complete the CER. Students constructed a claim that answered the following: How does the engineering design challenge you just completed relate to the science content you are currently learning? By incorporating the CER into the design process, students were required to explain their thinking and build an argument that is supported by evidence and reasoning. The CER served as a tie in between the engineering and the science content that the engineering design challenge was designed to emphasize. Although many student responses lacked sufficient explanation and reasoning (responses lacked detail and examples), students were able to articulate the definition of matter and to make the connection to the design challenge. Students were able to form a claim; they made the connection that atoms join to form molecules, which make up matter. This lesson was used to introduce the concepts to students; those who did not grasp the content during the engineering design challenge were provided with several opportunities and various modes to do so throughout the unit. This activity can serve to identify misconceptions that can be addressed in future lessons.
Conclusion
Ensuring that students do not miss the connection between the science content and its connection to the engineering activity is crucial for successful implementation of engineering integration. The Design Thinking Document is an organized way for students to walk through the design process while ensuring the content remains in the forefront. Additionally, the document ties in critical thinking and argument building as a means of linking the science content to the engineering challenge. The combination of content connection, personal connection, design process, graphic organizer, and CER makes for a powerful tool that holds students accountable for their learning, and emphasizes critical thinking supported by evidence and reasoning.
ONLINE SUPPLEMENTAL MATERIALS
Brain Pop Atoms video
https://www.brainpop.com/science/matterandchemistry/atoms/
Engineering Physical Science Middle School